May 2026: Hispano-Roman Wasn’t Built In a Day
Capsule Wardrobe Contents
Garb:
2 x tunicae of different weights
1 x chiton
1 x tunica strictoria
Accessories:
1 x silk veil
1 x Laurel medallion
1 x Laurel headpiece
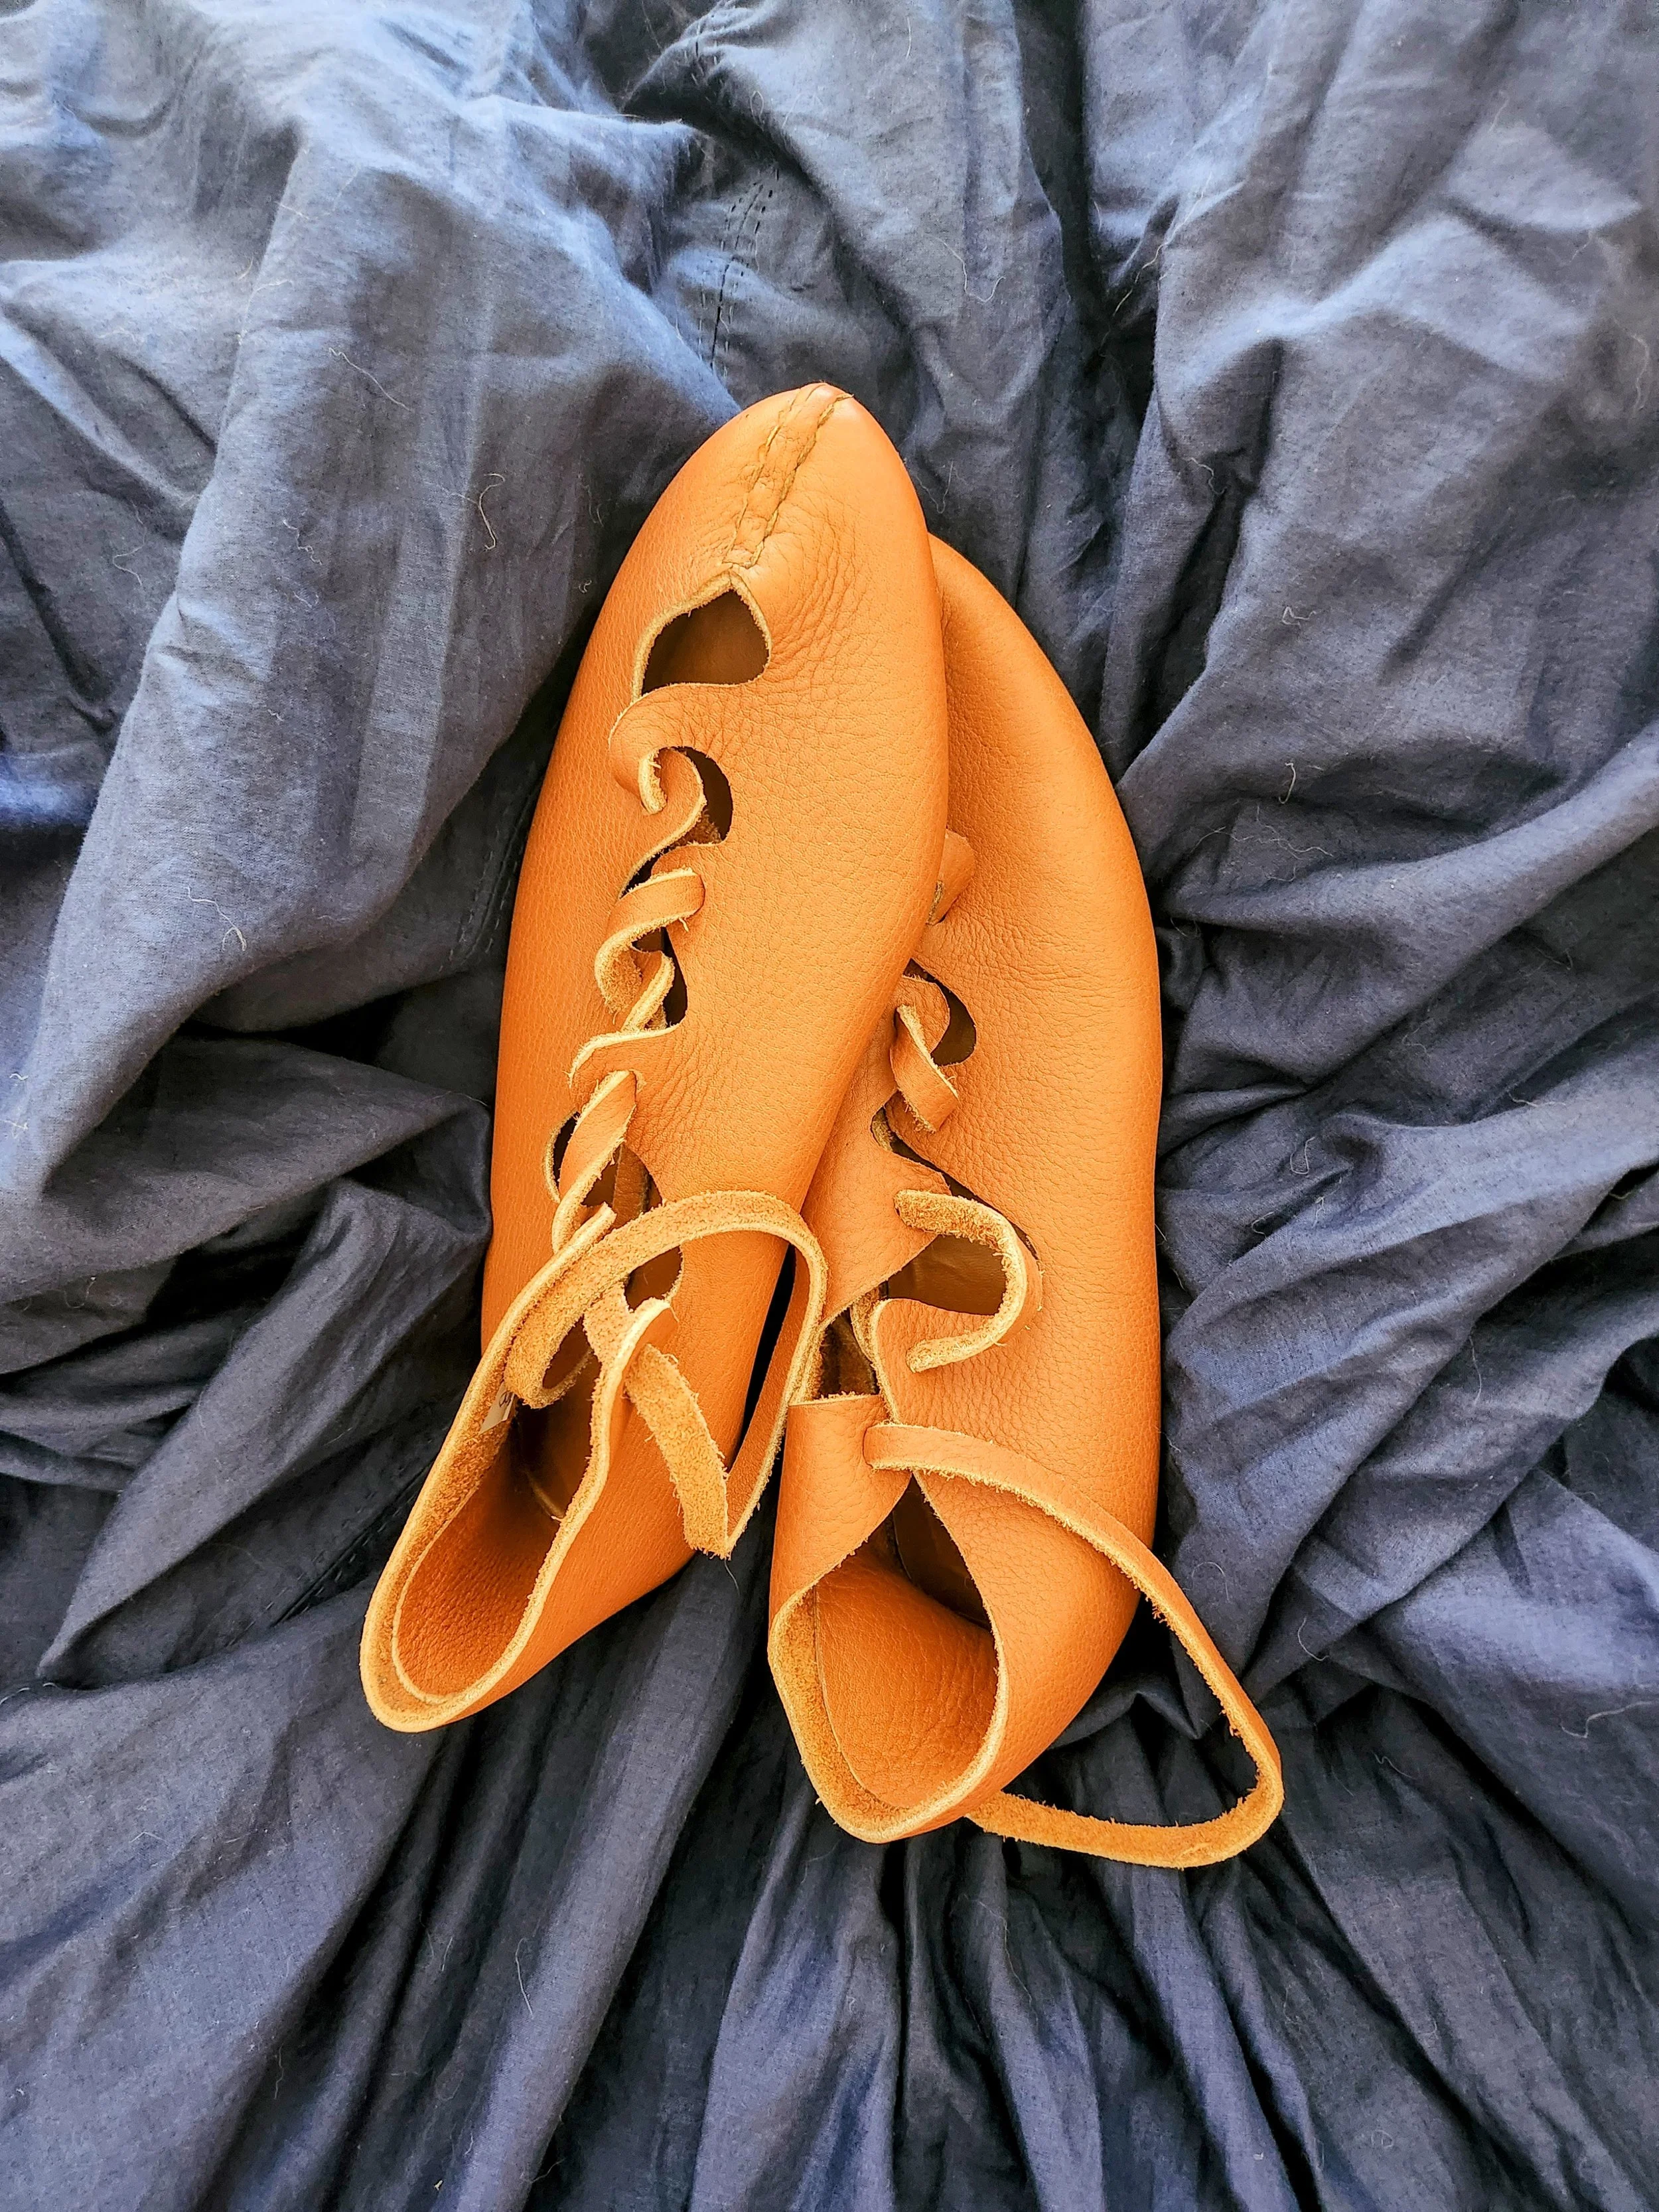
1 x pair of carbatinae
1 x set of fake hair
1 x fabric belt
Total Outfit combos:5 different outfits
But two months or so, very doable!
This was a fun project to work on, and was a great break from the Juana project. My goal here was to come away from it with an earlier period appropriate capsule wardrobe that can be brought out for various occasions as demanded by events and weather. I talk a bit about this in The Foods That Built Spain, but the Romanization of Hispania was simultaneously one of Rome’s most successfully integrated provinces and in many ways a change to Roman culture in Hispania itself. It was a process of creolization at the end of which, what emerged was neither Hispanian nor Roman, but distinctly Hispano-Roman. What that means for clothing is a little vague, but the general consensus seems to be that Roman styles became fashionable, especially within the upper and middle classes, who had more economic incentives to participate in that creolization.
There are three pieces in the Museo del Prado that I used as my inspiration for some of this outfit.
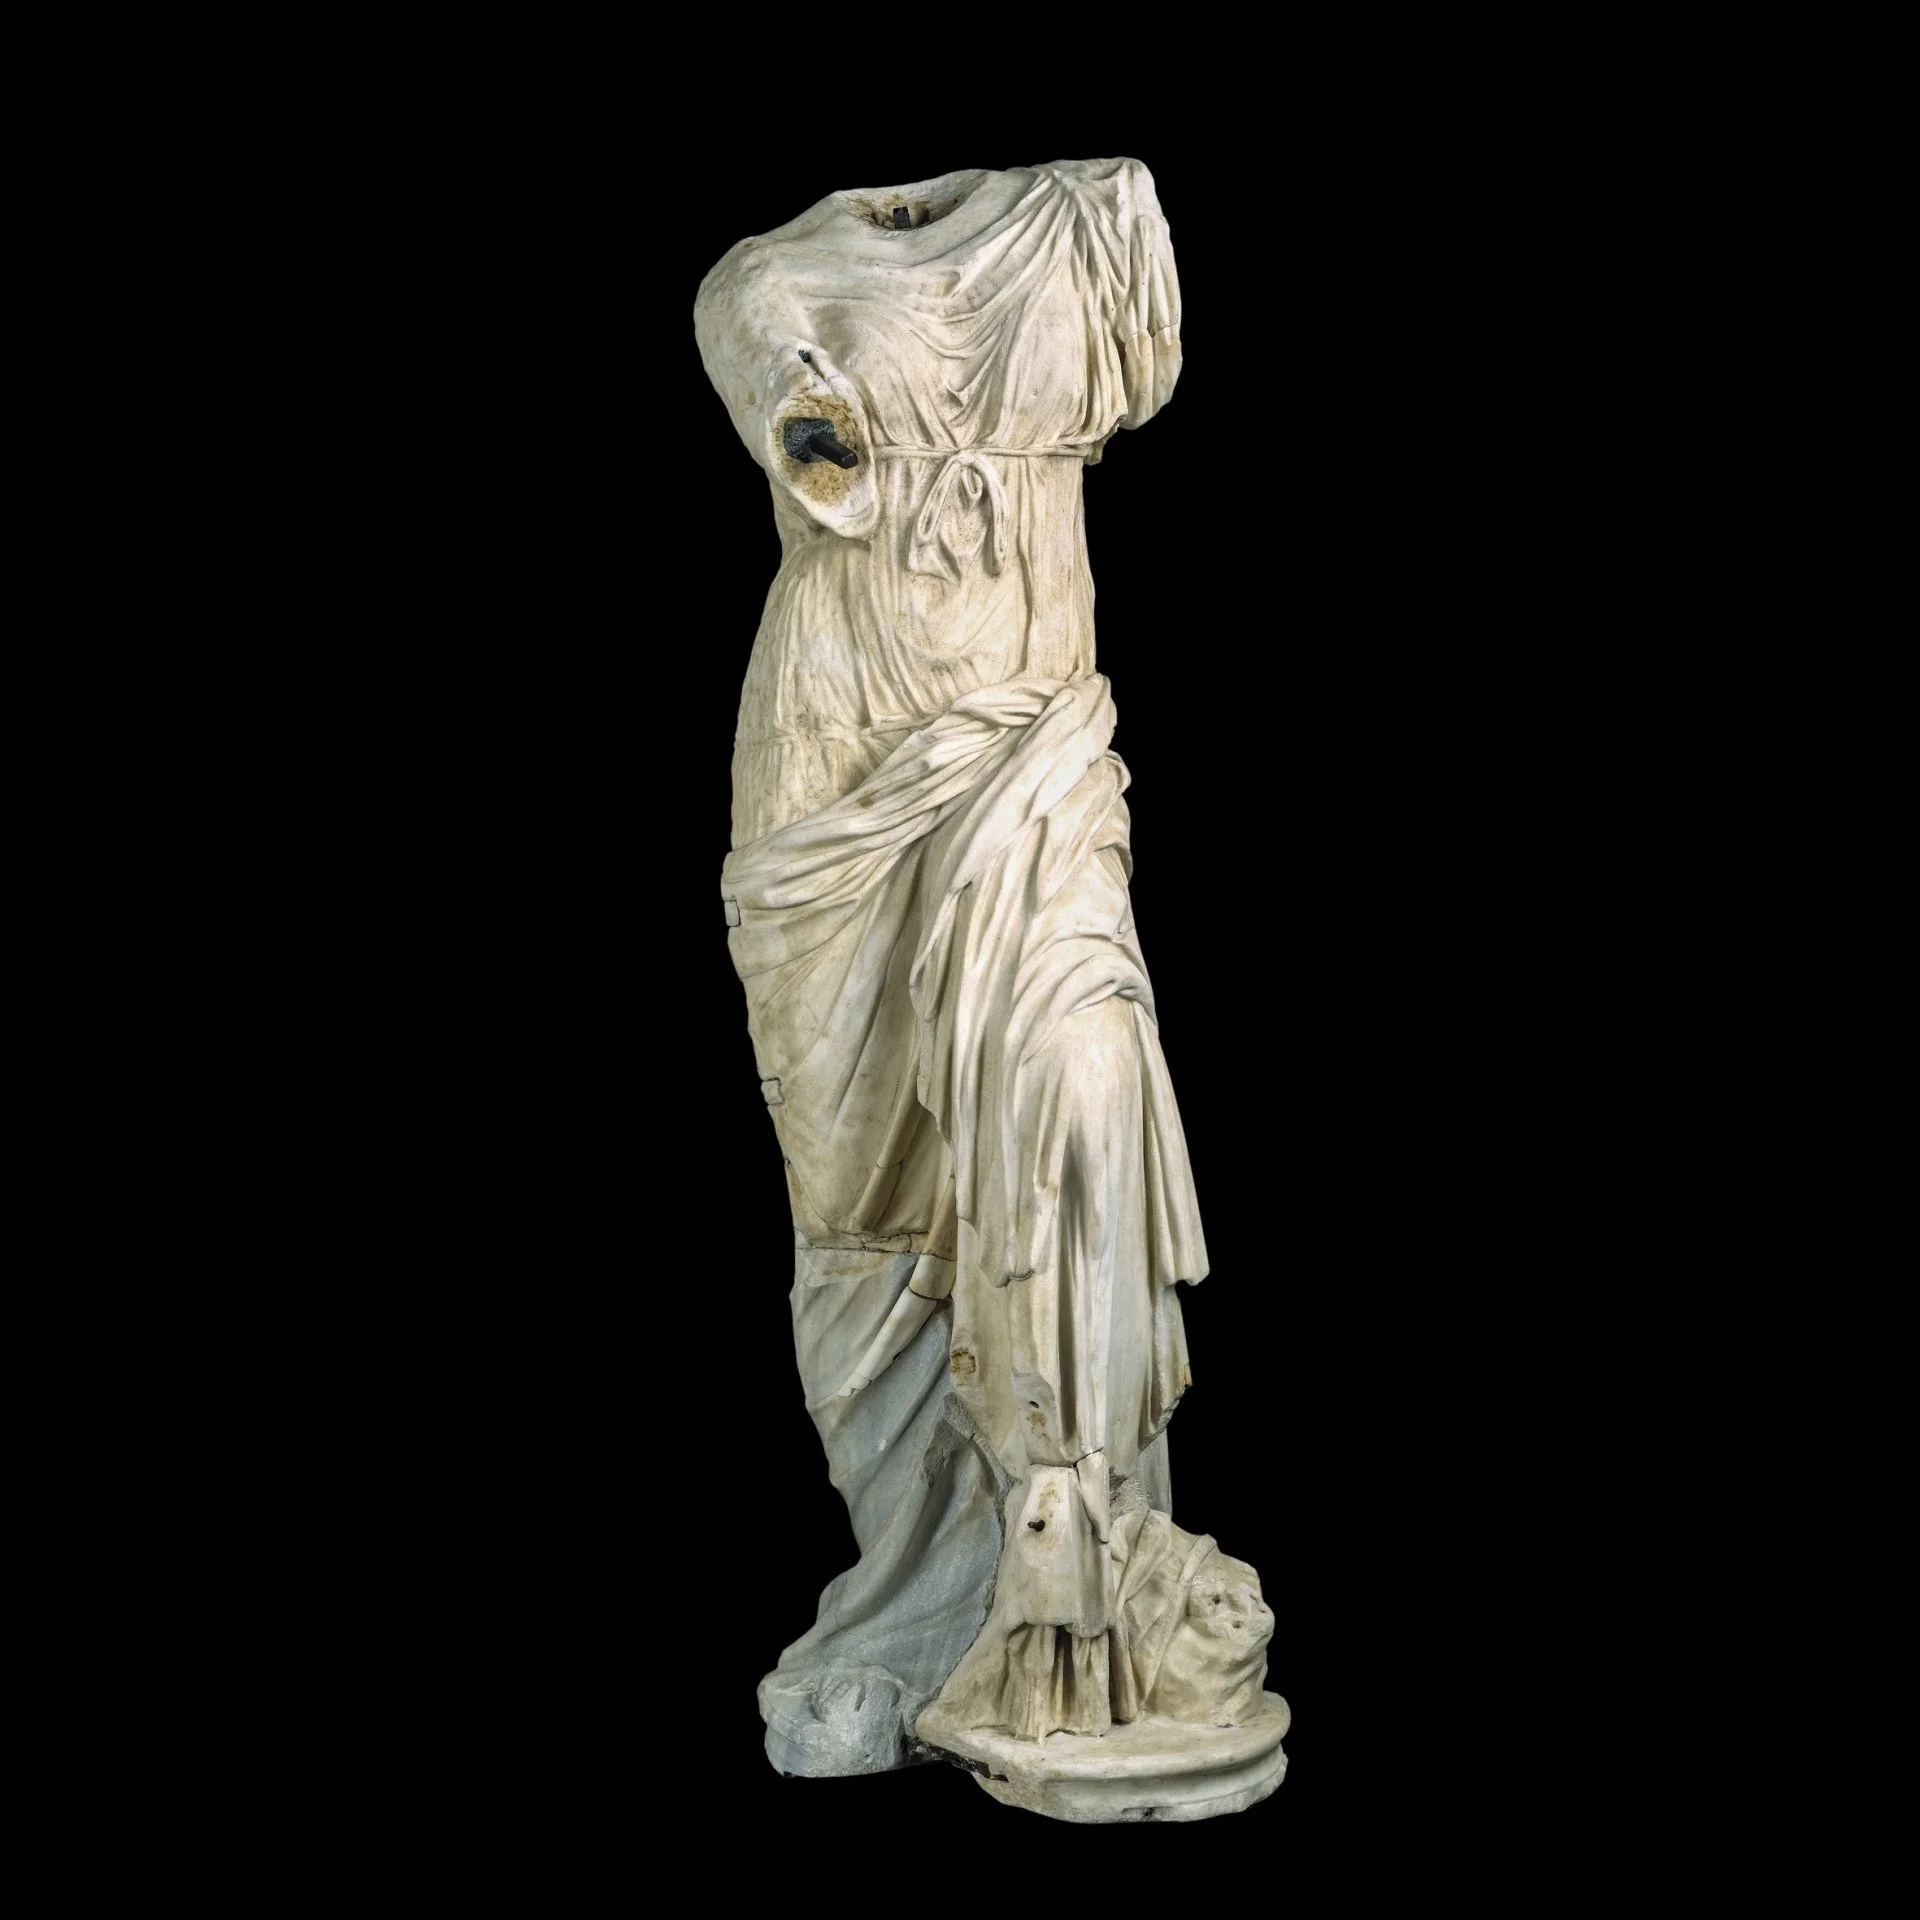
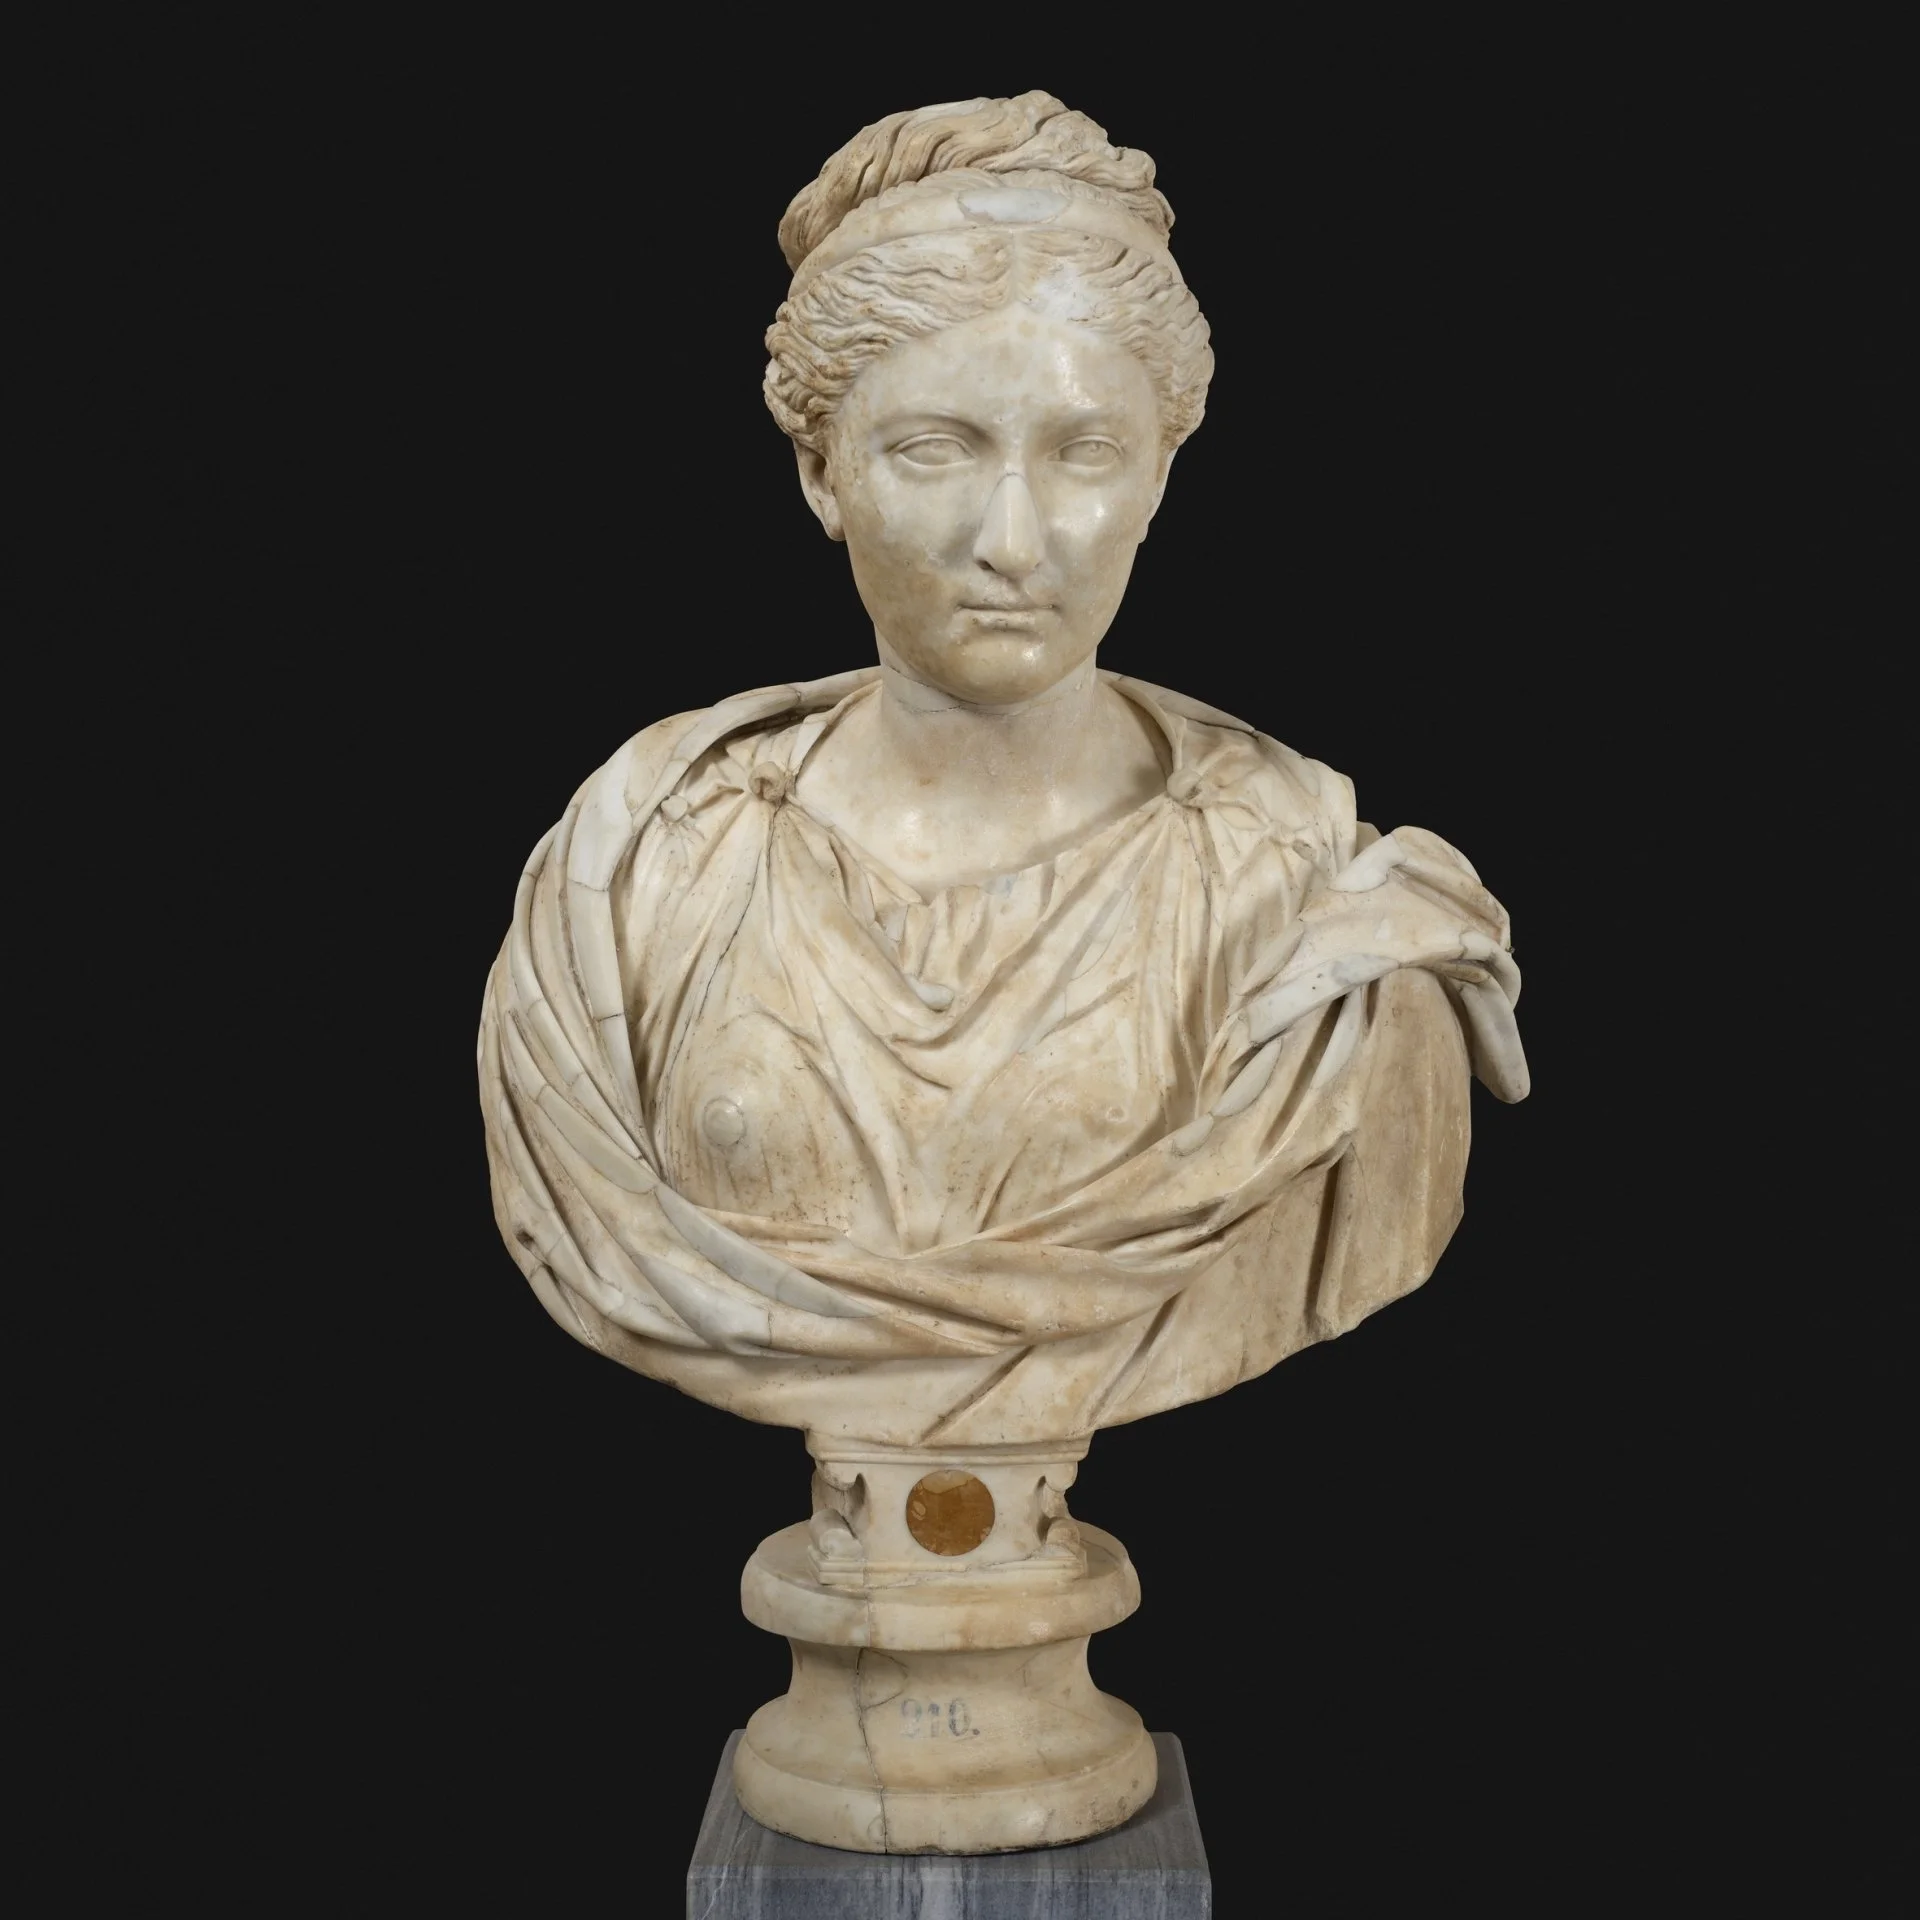
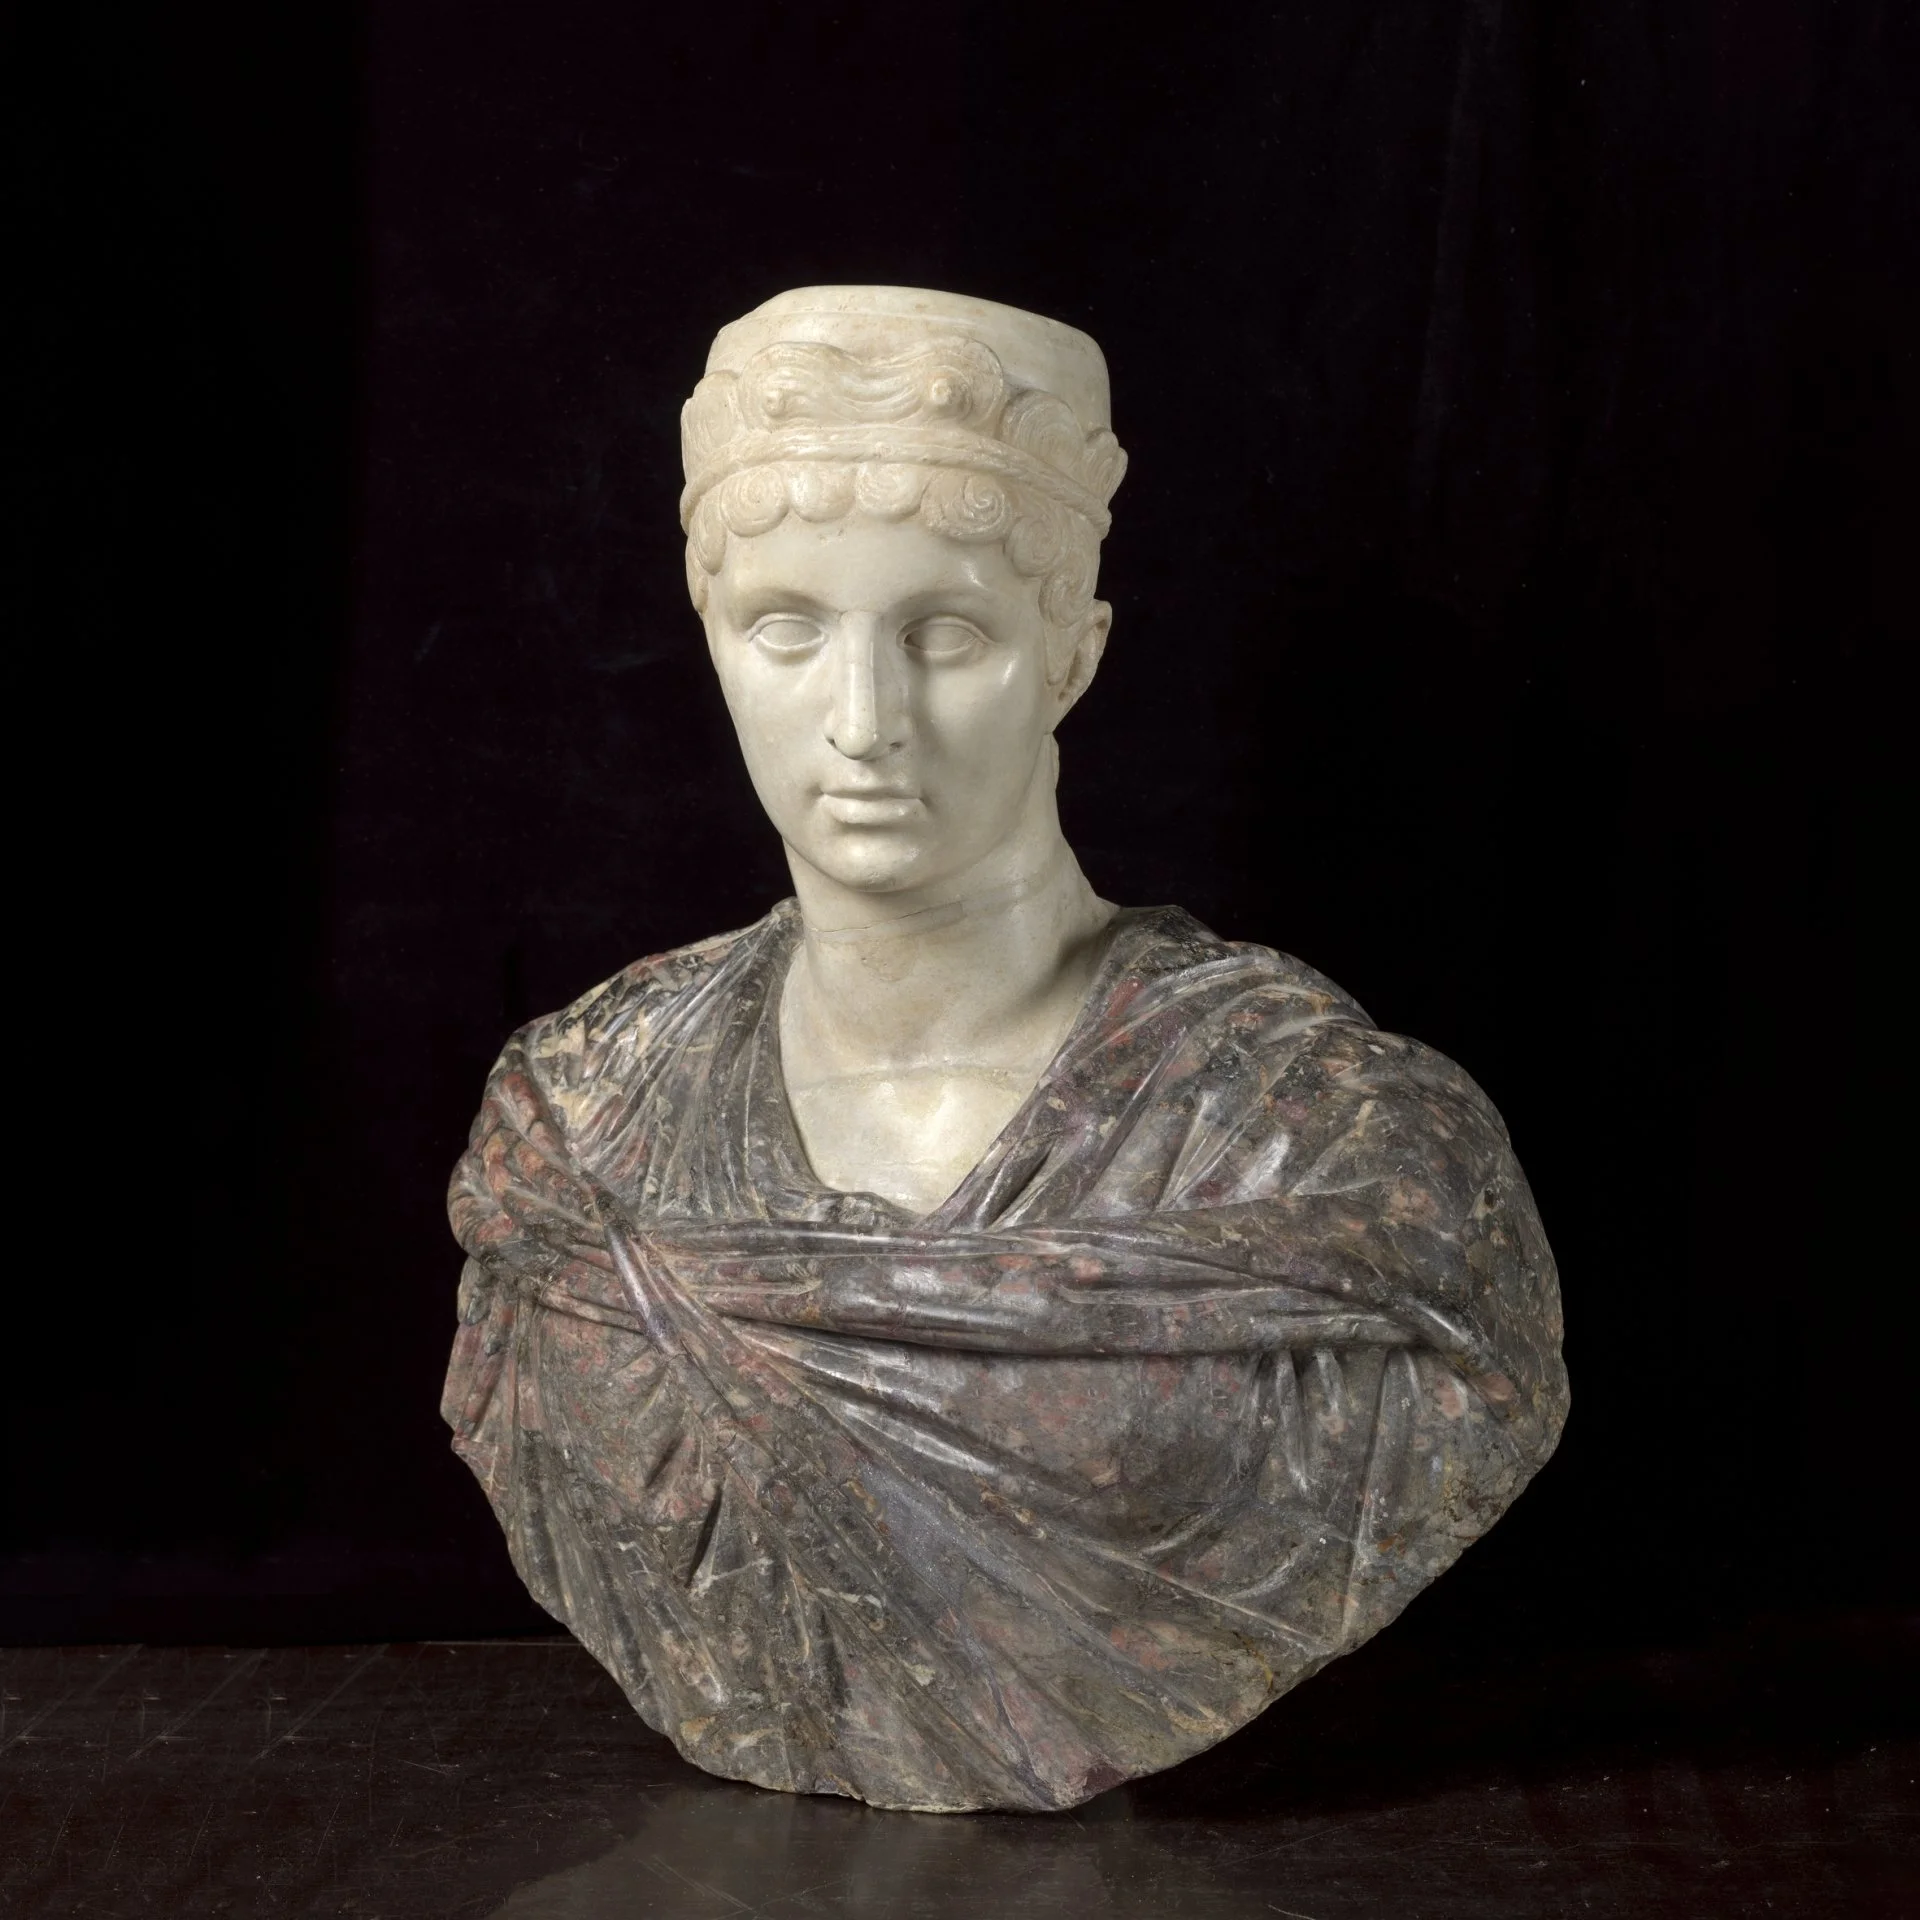
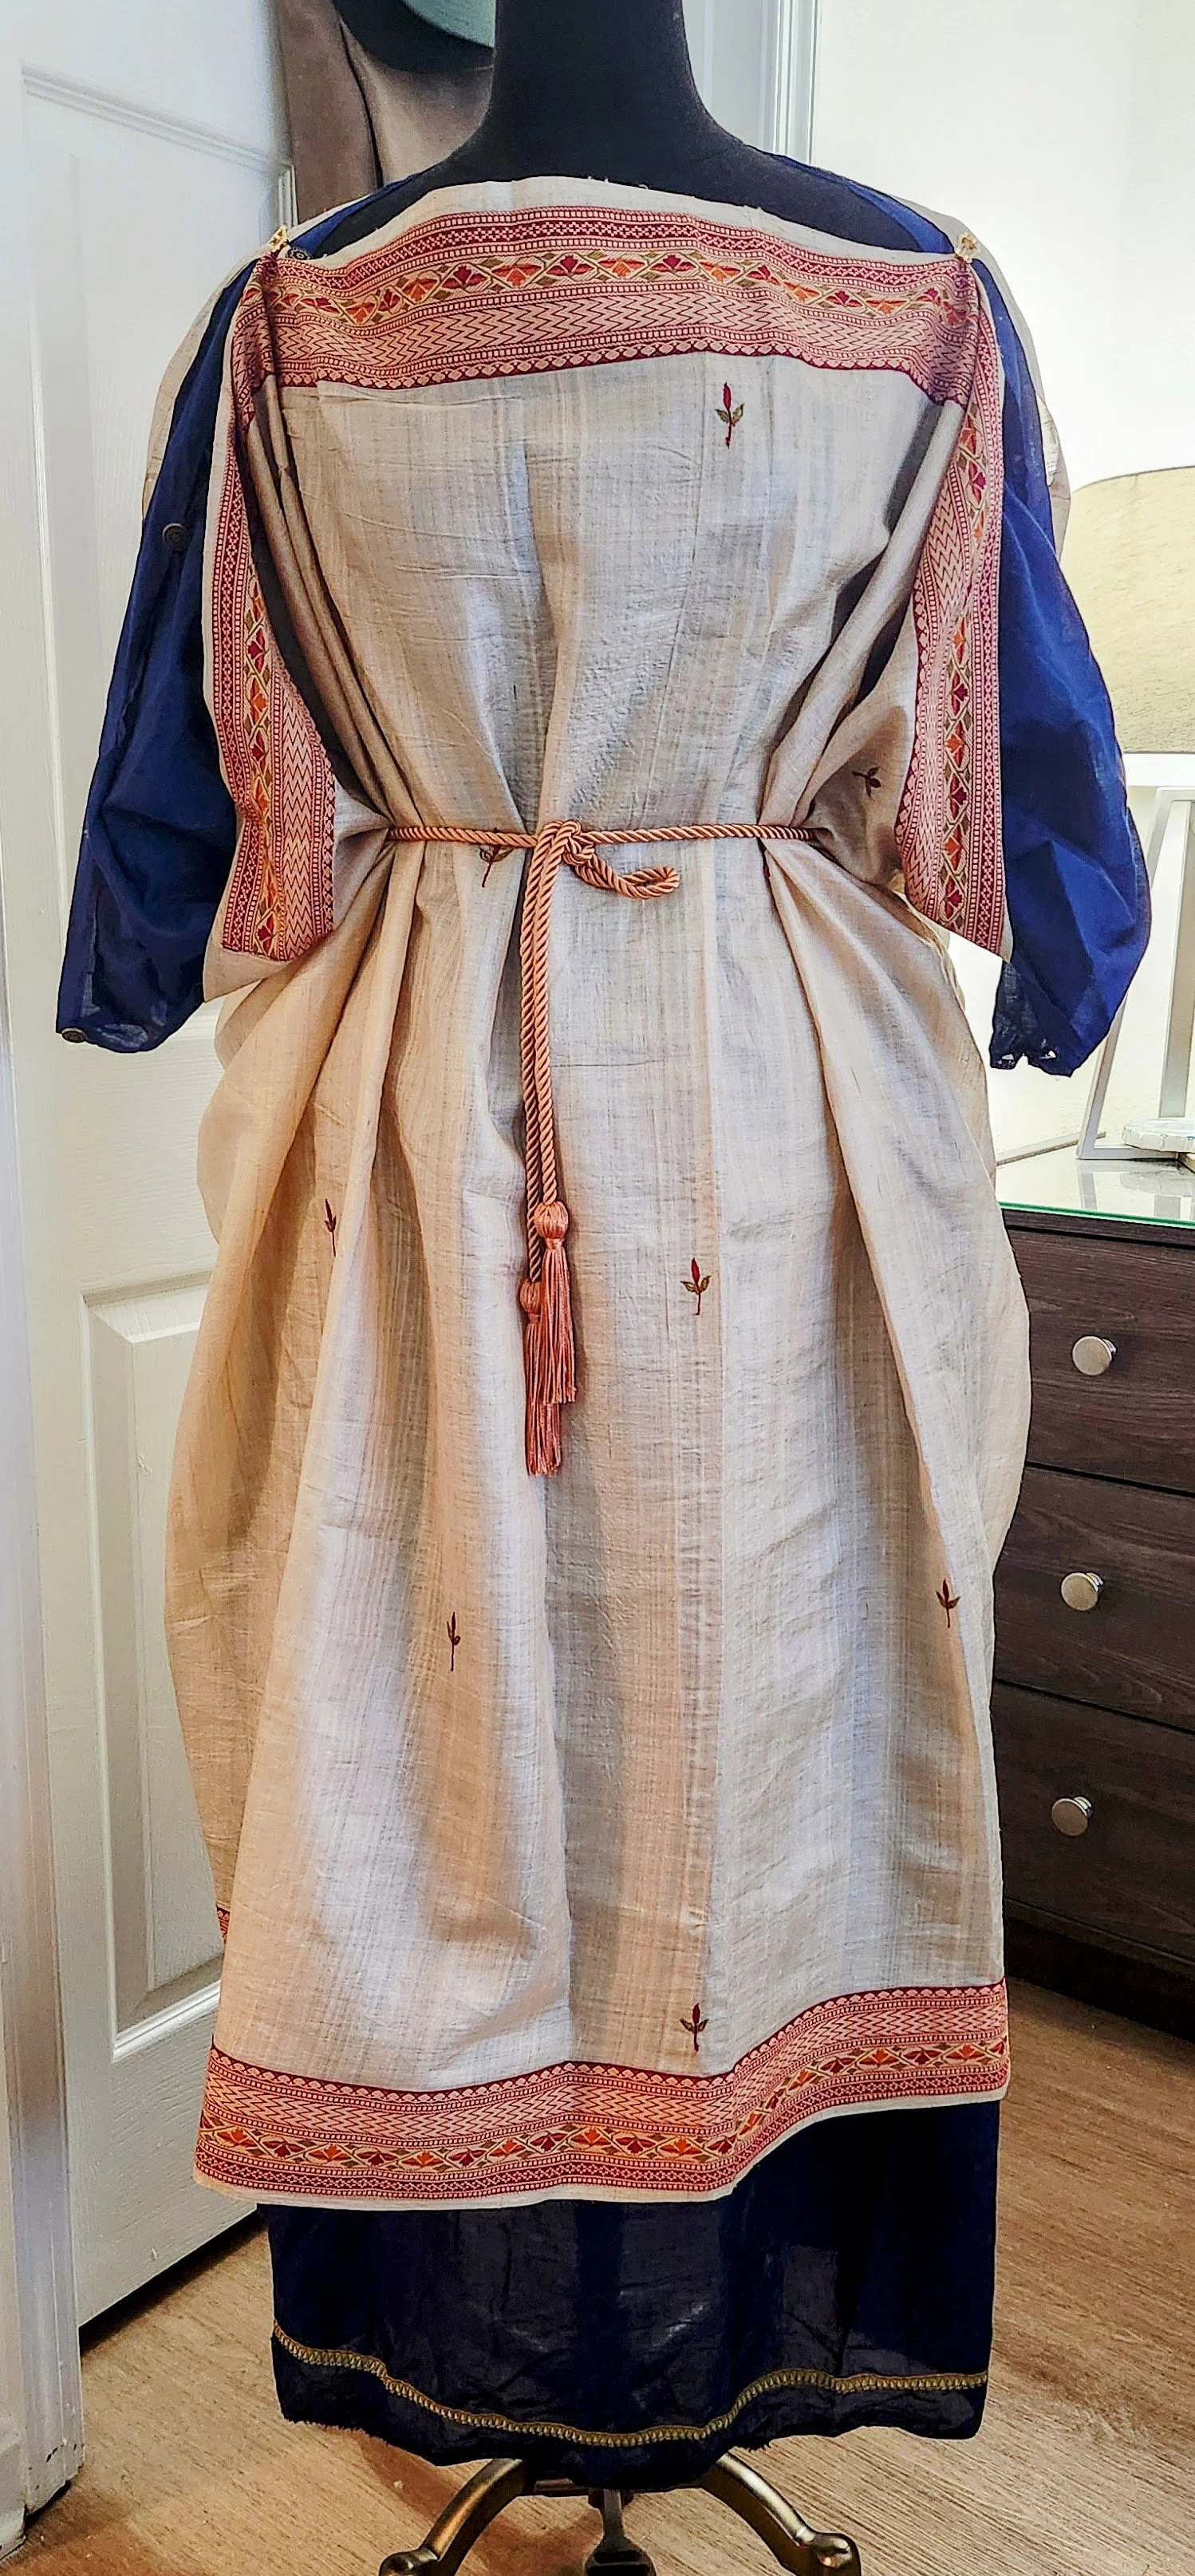
None of these are specifically considered Hispano-Roman fashion but each has ties to the place that I find interesting. The first image, the Venus of Madrid, is fascinatingly a copy of a copy of a Greek Venus. This piece belongs in the same school of thought as the Venus de Milo. Copies made of the goddess all have similar postures and carving style choices linking them, but each seems to take on a different take on her clothing and environment. This particular piece I really enjoyed for the higher scoop neck style, the visible evidence of her belt and slightly longer sleeves, and the interesting “is it a belt or is it a fabric join” situation doing on down around her hips where her outer layer is draped. The second is a bust of wife of Emperor Hadrian, Vibia Sabina. Vibia Sabina herself was born in Italy, but was both married to one and related to two different Spanish-born Emperors. From her bust, I pulled the evidence of of the gap sleeve on her tunica, the simpler more diadem inspired crown for my choice of Laurel wreath, her hair style, and the palla as a wrap more than just as a head scarf. Lastly, the bust “Hispania,” is meant to be a physical representation of the province of Hispania. This also has the palla as more of a wrap but I loved how the combination of marble types was used on this piece.
This capsule wardrobe is made up of the following pieces:
Tunica x 2:
The key, in my mind, to a successful capsule wardrobe is versatility in layers. The tunica being the foundational layer, I knew I wanted two options.
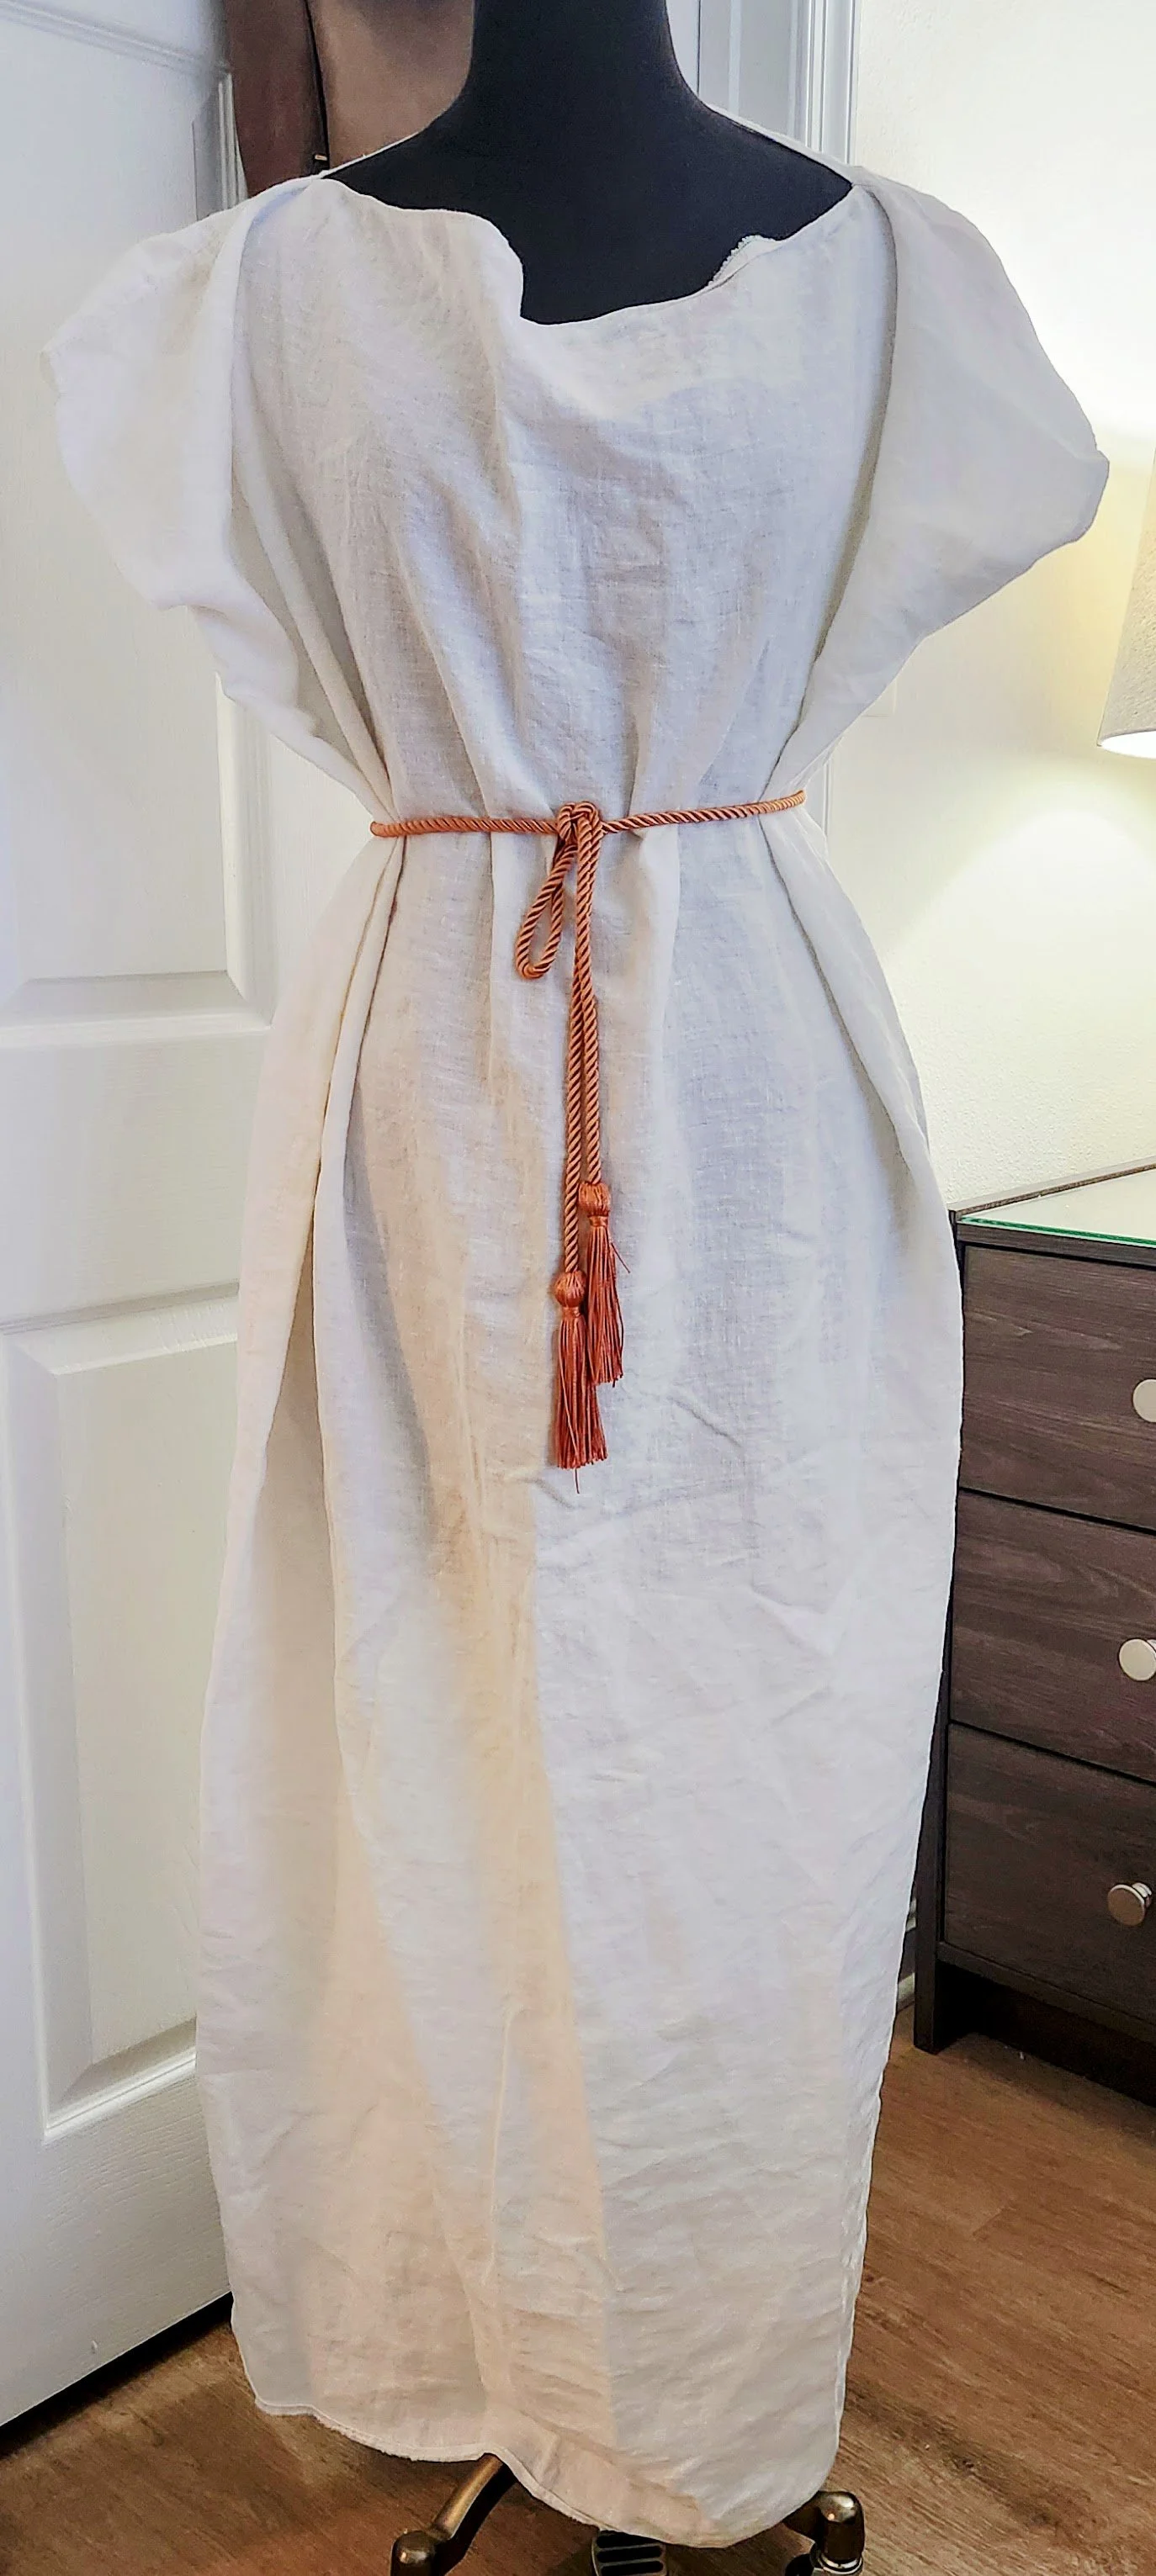
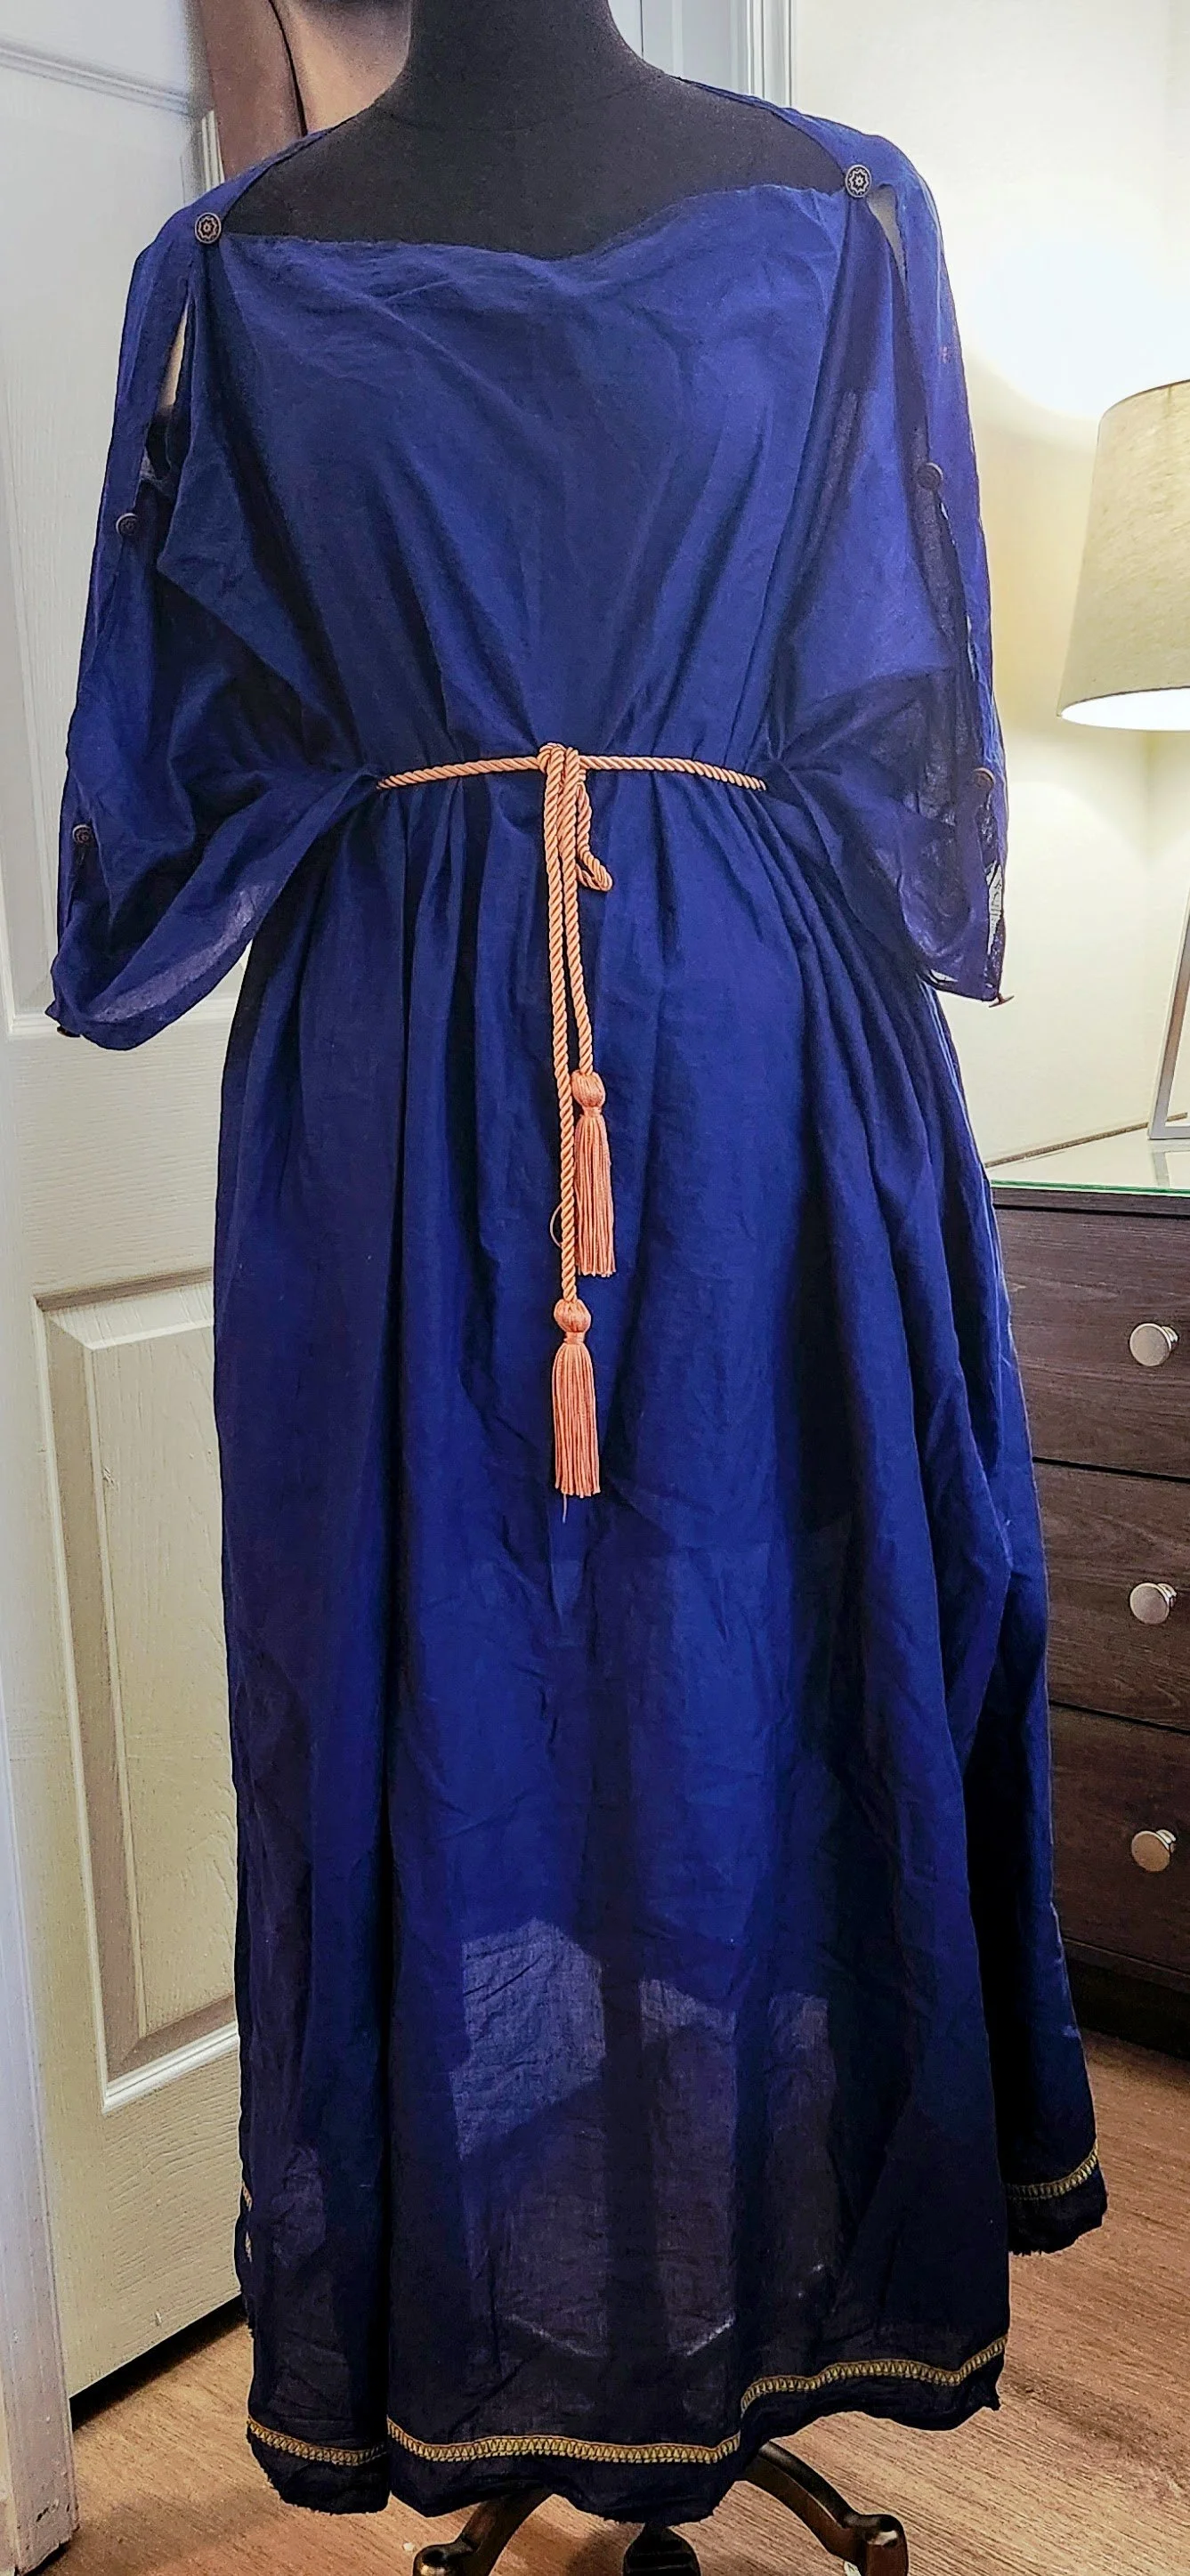
The first I made is one in a lightweight navy blue cotton from Mood. This one is done as a gap sleeve top with buttons with a lovely little star (in homage to Highland Foorde) and a subtle leaf trim down at the bottom. The goal with this one was to be both a bottom layer for the chiton as well as a possible top layer for the other tunica if I felt like being more casual. It is made of two rectangular pieces sewn up the sides and hemmed on the top. The seams are stitched flat on the sides but I was lazy and left the selvedge edge on the bottom unhemmed. The front is a couple inches wider (55” in the back and 61” in the front, wrist to wrist being 58”) than the back to allow for the gapping to be more emphasized, but wears more like the Venus of Madrid’s scoop neck. I really like how this piece feels, but I made it wrist to wrist wide, and the sheer bulk of it is a bit unwieldy. I have to be rather clever about how I tie and drape it to not look odd with how it bunches.
The second tunica I made is much narrower, as a test for my intended width of the tunica strictoria. I made this one elbow to elbow wide (28” in the back, 34” in the front, 31” elbow to elbow), with a little more drape in the front than the blue. The front was also about 3 inches wider than the back on this one, but I chose not to leave gap sleeves. The purpose of this is to be able to wear this layer under the blue above without the buttons on the gaps interfering with each other and also to wear it under the tunica strictoria without interfering with the shoulder line. This piece is made of white linen I had on hand and is unadorned. The beauty of this particular piece is that the linen is heavy enough that I could wear this by itself if I wanted to be very, very casual.
Chiton
I chose to do a chiton instead of a stola for this capsule because the blue tunica above could effectively serve as a stola when worn with the white, but also because I wanted to experiment with different lengths of layers and the sources I used (two documents from classes taught by Baroness Cynthia Anne of Silver Lakes, OL), indicated that stolae are always full length where the chiton could vary. This piece was simply made of the same width as the blue tunica out of a recycled artificial silk sari that was gifted to me. I left the trim on the top and bottom for some additional weight to the hems for draping and only put two attachment points so that the gap sleeves of the blue tunica could be visible. This layer though is really where the bulk issues stared becoming evident. What I ultimately ended up deciding to do is to tie my belt through this layer, capturing only the front while leaving the back open. It was much more comfortable, gave me more flexibility, and I think makes for a better wearing experience.
Tunica strictoria
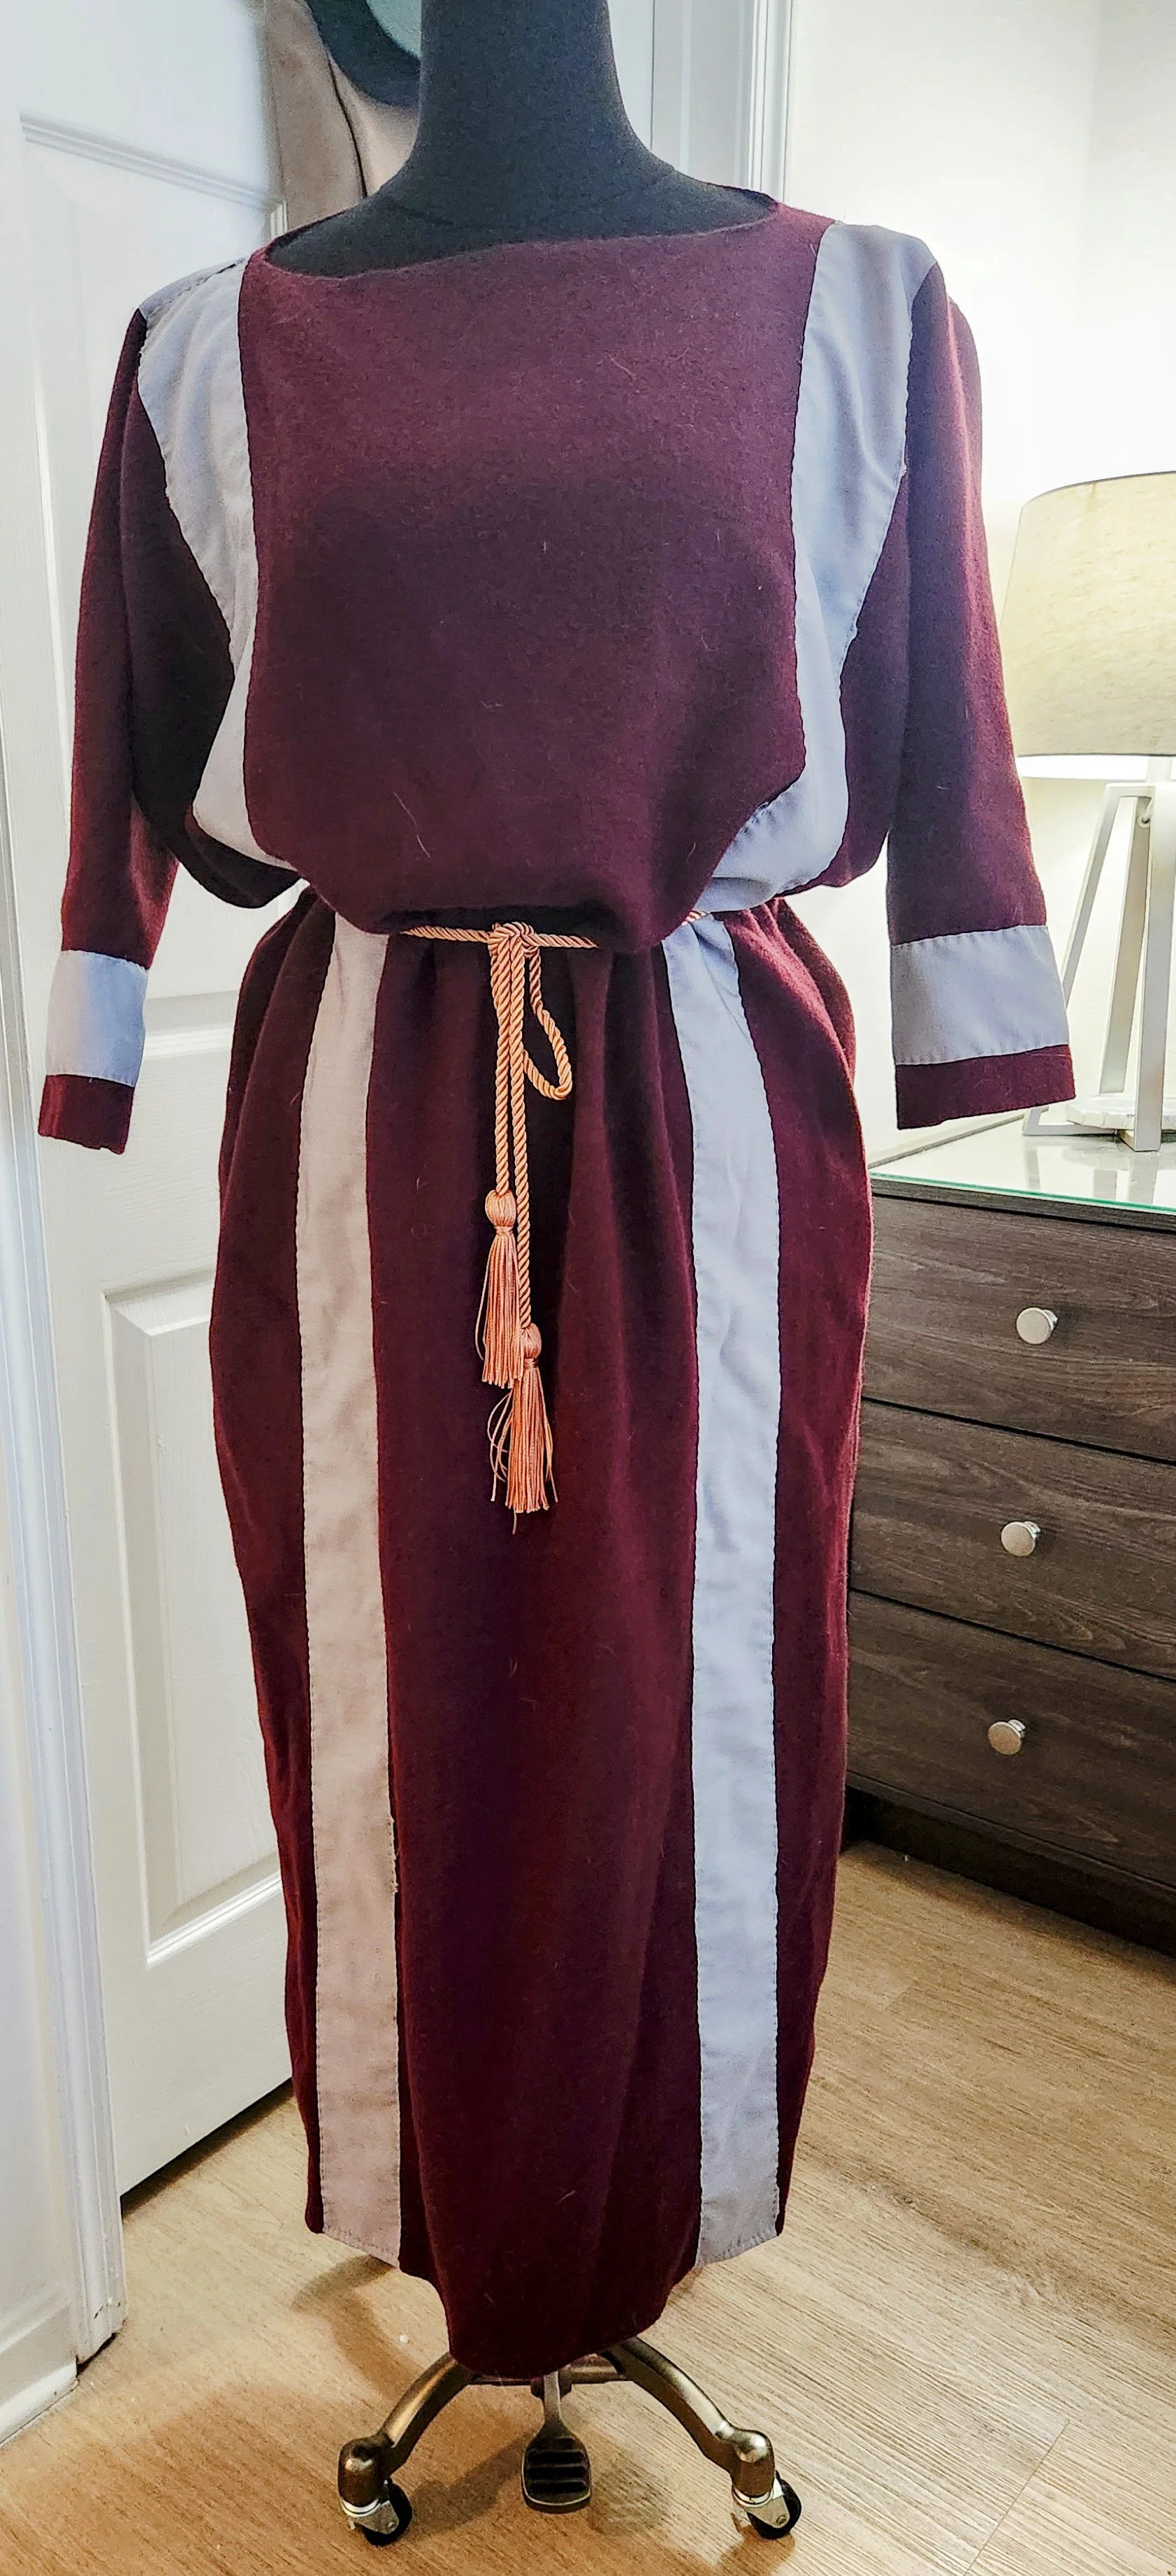
This piece was kind of the piece that inspired this whole project to begin with. I had been thinking about Hispano-Roman for summer, but turning it into a capsule project came about because Highland Hearthglow this year is Viking, and as my previous experiences have told me, I am viscerally uncomfortable wearing Viking. But I still wanted to find something earlier period that could be done for this to support the theme and Bea pointed me to some Pins she had and I kind of fell in love. The specific image is this one here, from an artist and researcher named Olga Bugaeva. Another SCAdian, Magistrissa Anna Dokeianina Syrakousina, has a wonderful article on the garment that I referenced in making my piece as well. I did not end up making it as wide as Magistrissa Anna’s, for the bulk concerns above, but I find the contrasting striping really striking.
I settled on wool for this, and got some gorgeous burgundy wool from a Polish supplier called WoolSome in a color called Very Dark Burgundy for my dress base. I went with a light weight wool twill, knowing I’d be layering on, but also for the versatility of summer weight wool here in Atlantia. For the stripes, I found a deadstock wool from Mood in a light gray that provided both a value and tone contrast that I really liked together with the red, and it coordinated well with the gold/bronze tones of my accessories nicely. Both pieces are 28” wide in the body with 8” for both segments of the arms, and 54” long.
I definitely did not make my sleeves long enough and I can see where some extra width in the body would have helped that and with more grading into the wrists. The extra fullness in the sleeves largely comes from both the width of grading as well as the extra bulk from the “pushing them up” effect of making them too long and making the forearms more restrictive. If I do this again- which I very well might, I really love this garment- I will probably go back to 31” wide with 8” for sleeves. This garment could be very fun in an even lighter weight wool or in a linen but I have my eyes on this navy with gold accents.
Veil
This piece is definitely an anachronism piece but I had impulse bought a yard of a gorgeous blue silk organza from Silk Baron that was screaming to be one of those draped pinned on veil type deals. I hemmed it and soaked it to soften it and it coordinates really well with the blue tunica and with the chiton. I may at some point in the future add a proper palla, but I have not decided on that for sure yet. Because the veil is full on cheater veil, I decided to attach it to some U-shaped ballet pins permanently (sewn and glued in), so that the spacing is ideal for my needs and it can be attached under or around my fake hair.
Laurel wreath head piece
This element is definitely more modern but I liked it for its simplicity. Finding one that wasn’t overly bulky was a challenge for me but was definitely a goal based on both Vibia Sabina and Hispania above. Both of them have simpler, thinner bands holding their hair back so I didn’t want something too big. I first bought a wreath shaped piece and glued ribbon into it to prevent catching on my hair. This worked great- until I put my hair piece on. So I ended up buying a second crown piece, cutting it down so it just had the section I wanted, and wearing that like a headband instead. It also has the added bonus of matching Vibia Sabina’s style a little more closely. This was an end of the month pivot, so this is the one aspect that is not yet finished.
Laurel medallion
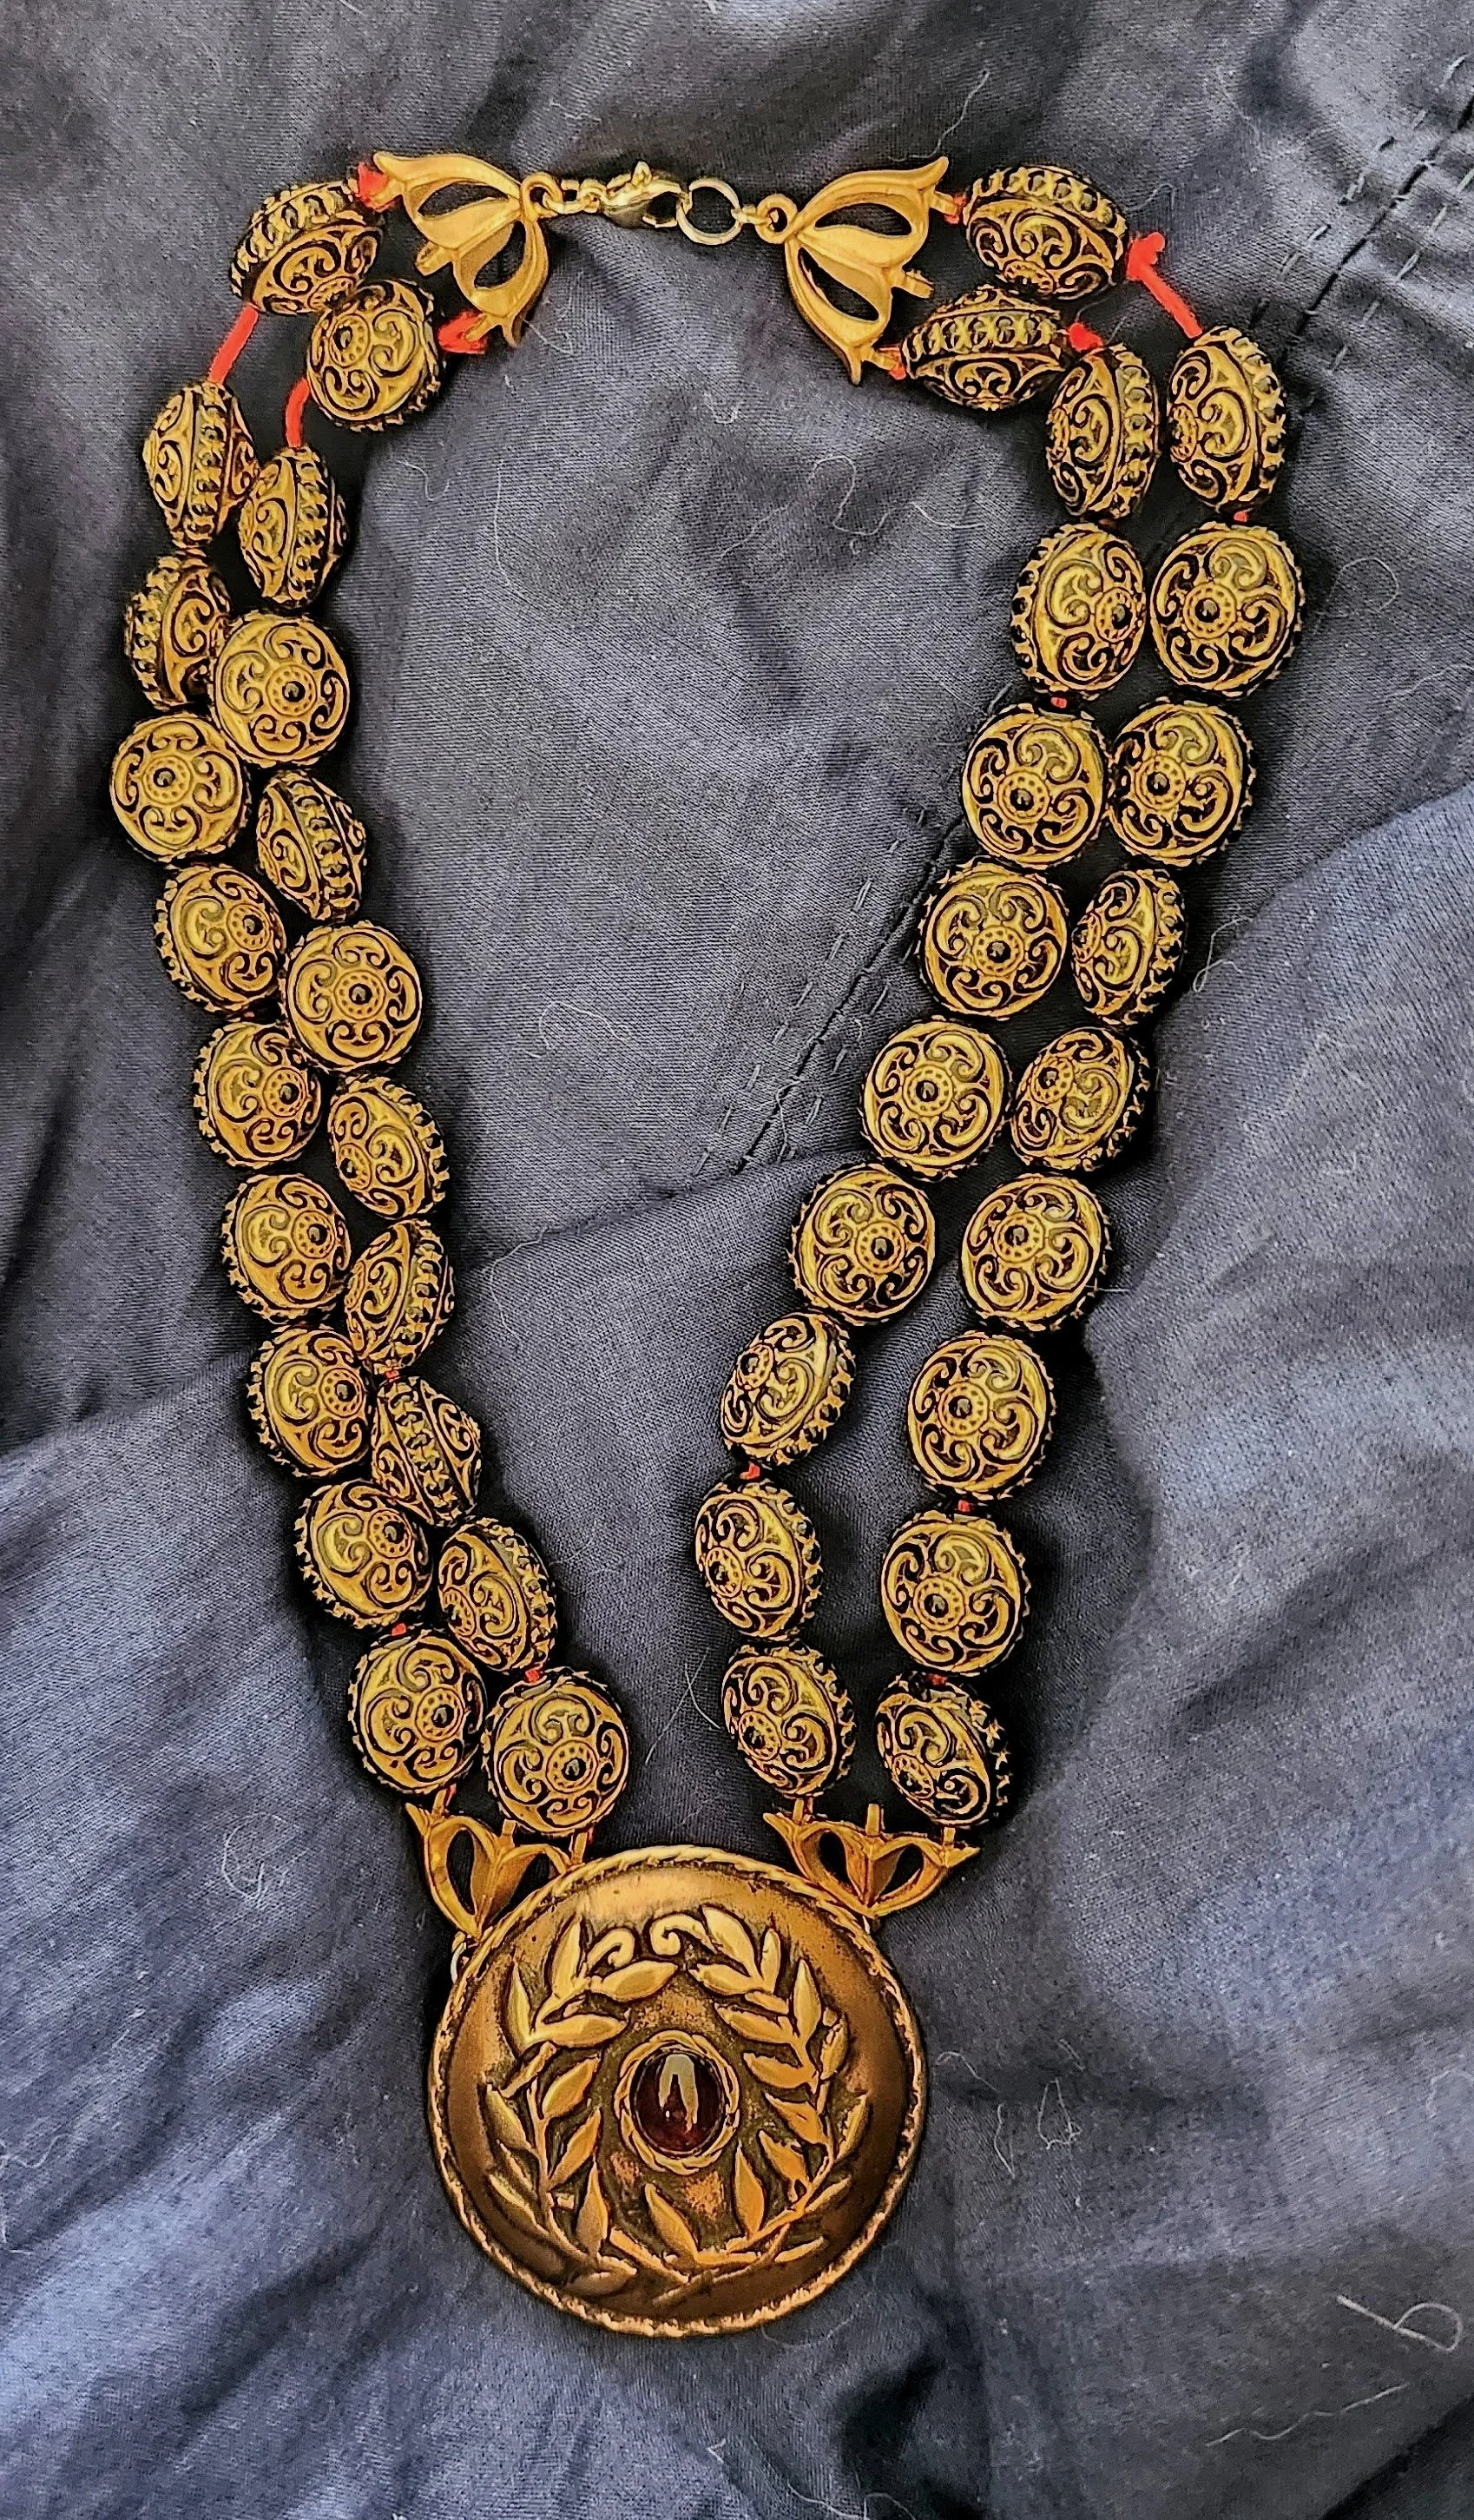
This was a partially purchased piece and partially made. The medallion itself is made by Master Ark with a gorgeous garnet in the middle. It has rings on both sides and in his product photos, it shows a woman in German garb with a three strand necklace connecting into them that I really loved. I also happened to have some beads that are well appropriate for Hispano-Roman, so I bought some decorative connectors and made a two strand necklace to wear. I love how it turned out so much. It’s got heft to it that makes it comfortable to wear, without being overly ostentatious. I also love that it’s just about the exact same length as my go to mundane Star of David, so I can wear them together without breaking up the outfit- in fact, the star is in the picture to the left but hidden behind it.
Belts
I had originally planned to have a leather girdle style belt for this, made out of my left over goat skin leather from the chapines. But on testing out the tunicae, I landed on a fabric belt being a better fit. I used my apprentice belt to test out the outfits, but for the tunica + chiton combo, my red Laurel belt works nicely as well. For the tunica + tunica combo, I went and found a graduation cord to test out this option. I like the cord option because I could also add a leather girdle section to that if I so chose later on. So all told, I have three belt options if I really wanted them: red and gold Laurel belt, bronze cord belt, and possibly leather girdle attachment for said bronze cord.
Footwear
This was an interesting challenge. I knew I needed footwear choices that could be for both the summer and winter outfits, as well as had support for both my feet and ankles. This meant something with closed toes, a heel covering, and enough ease to wear socks under. I ended up settling on buying a pair of carbatinae shoes from Boots by Bohemond. I could probably make these myself, but I like that these have a sole and non-slip options and didn’t feel like learning to do that on my own. They’re super comfortable and I’m happy to have them as an option for both sock weather and sockless weather.
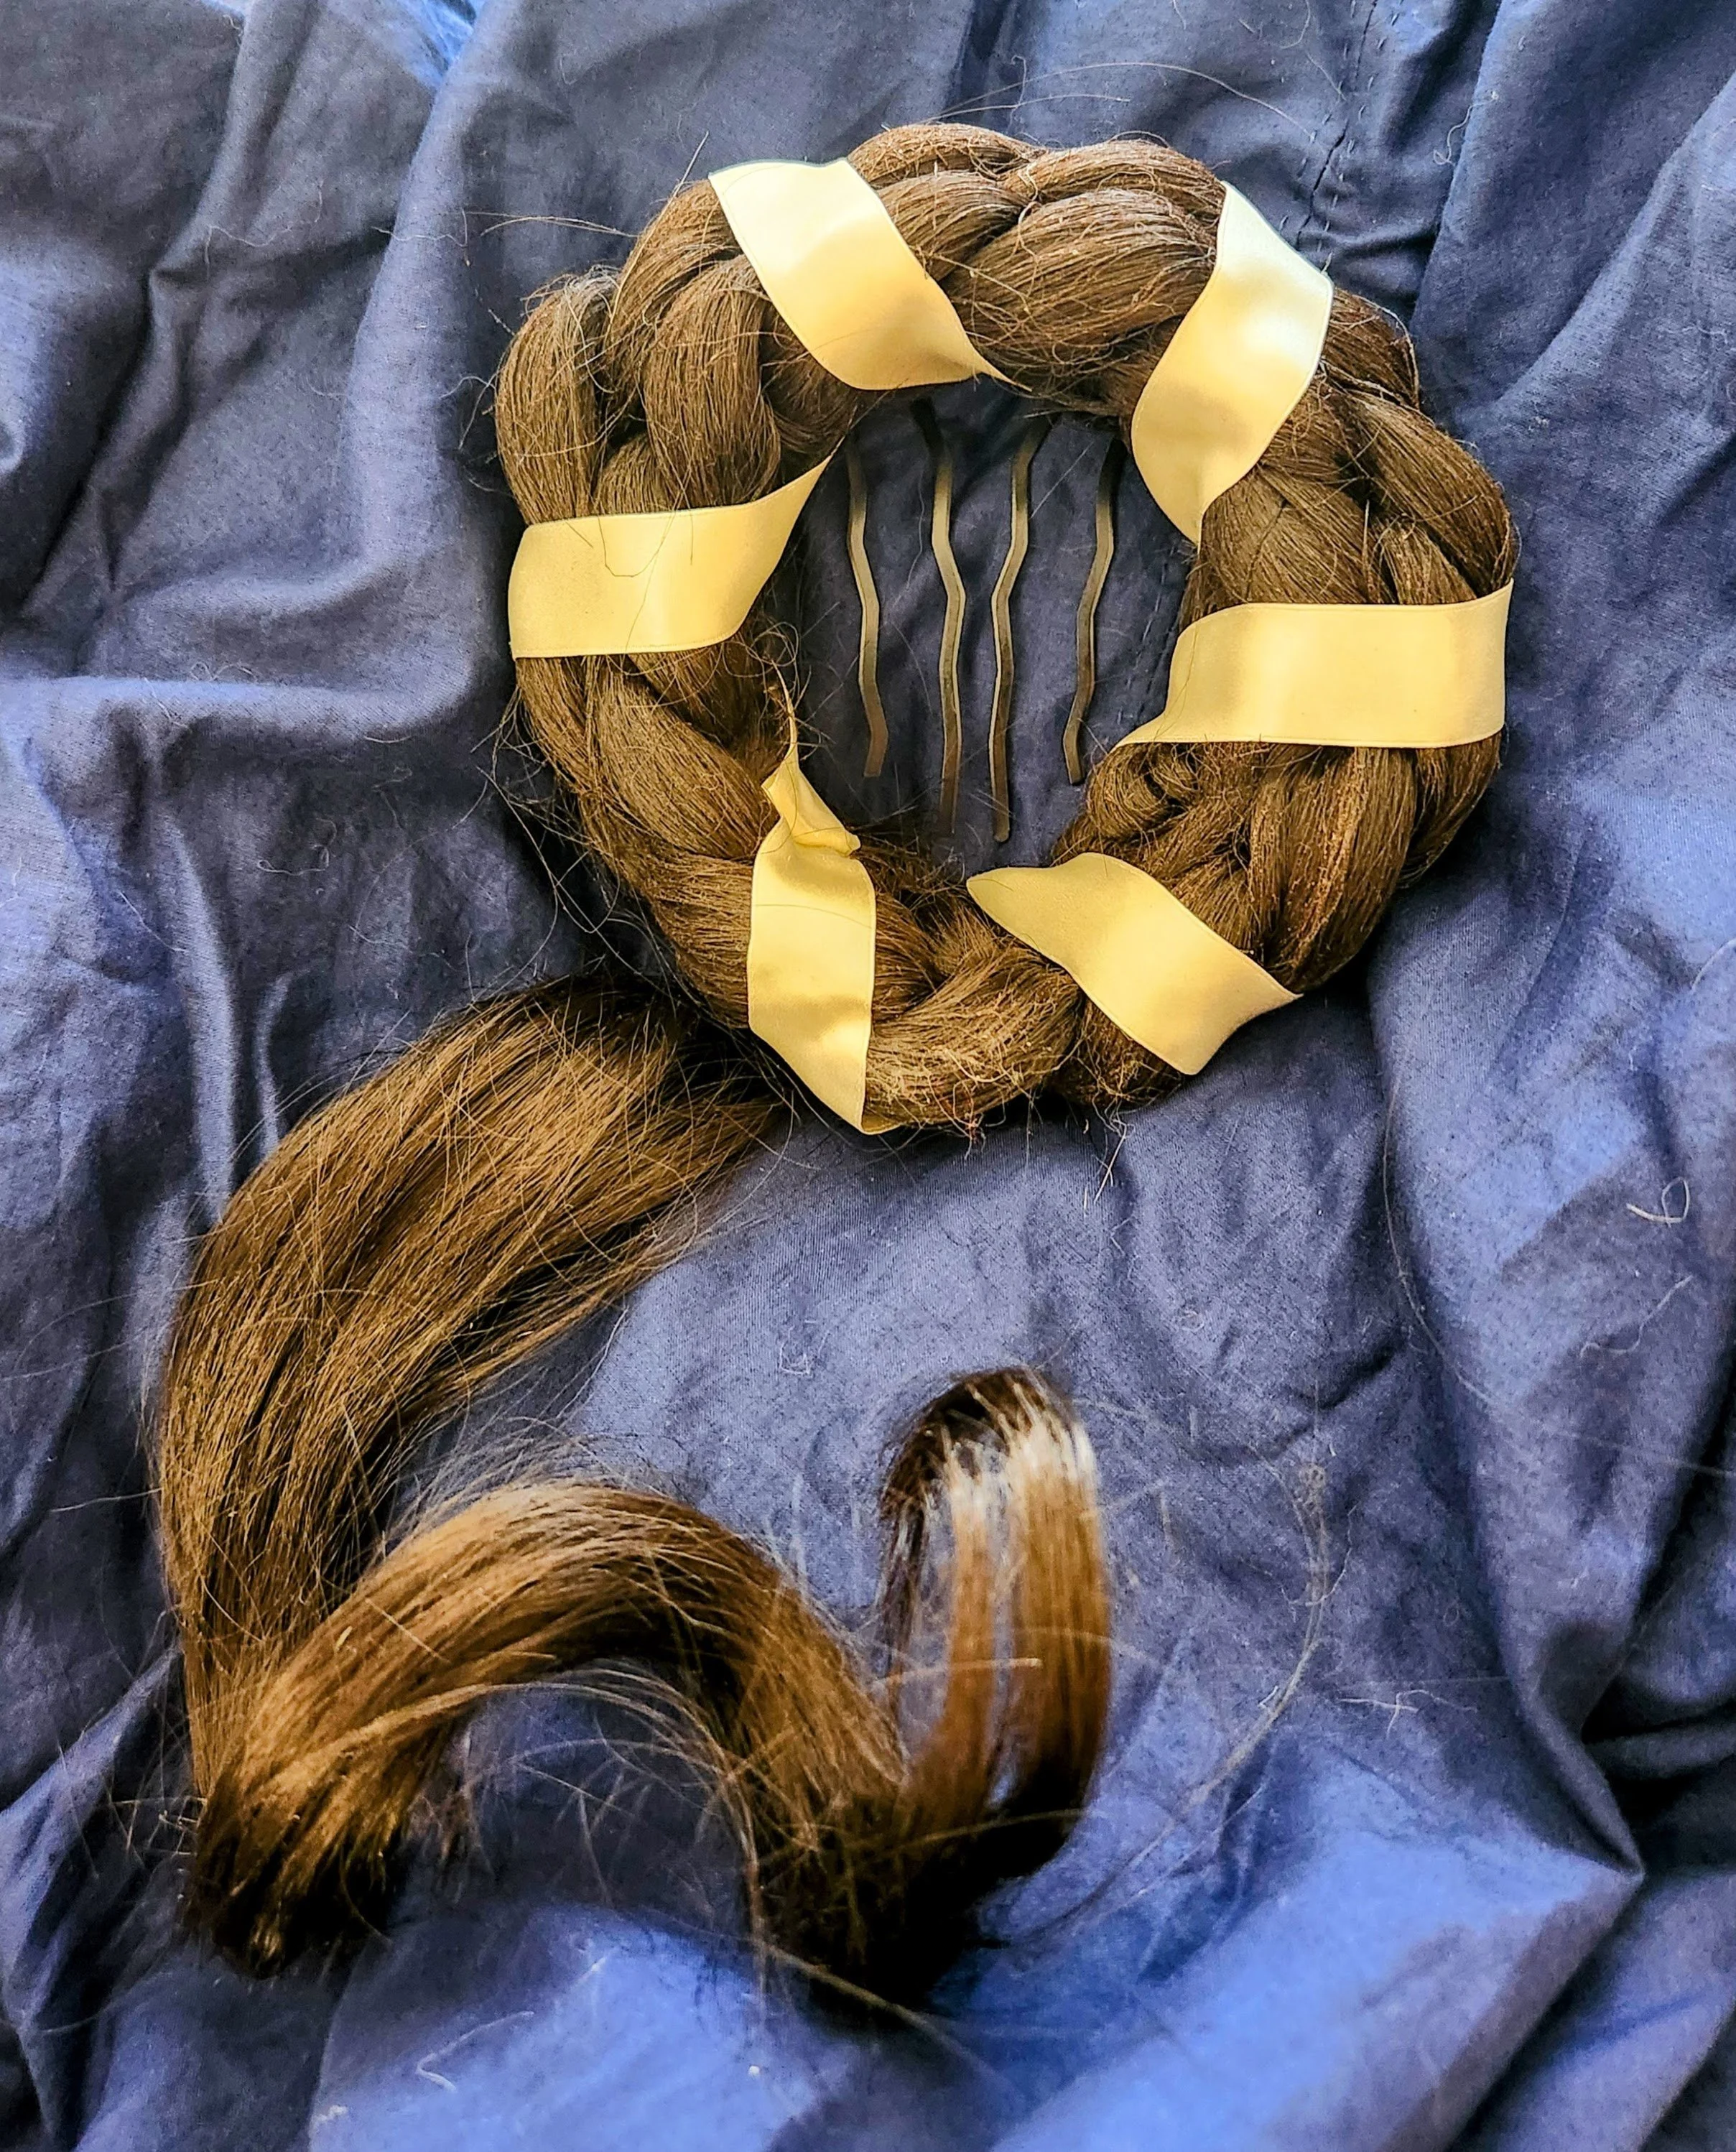
Fake hair
While my hair is not short short, I do keep it on the shorter side particularly during summer. It is not really conducive to the wrapped and braided styles of Roman hair dressing like this. So I decided to make a headpiece I could wear with my natural hair and use to give it some bulk for things like the veil to pin into and the diadem to sit on, etc. When it’s longer over the winter, it can be taped, but in the parts of the year where it cannot, I still want to be able to have a pretty and appropriate hairstyle for my garb. I went simple with this, just a round crown style and bought some fake hair online that I then braided into several braids that could be wrapped, sewn, and spray glued into permanent place. I used some millinery wire to frame it up and some decorative ribbon left over from previous projects mixed into the braids for some visual interest. Lastly, I got a collection of multi-pronged combs to attach it to my natural hair, as well as experiment with a decorated beaded and wire wrapped comb idea. It turned out so cute and was a fun little stretch goal for the last couple days of May.
Accessories
The last component I made was a quick little fun project with some left over pieces. I wanted just a cute hair accessory, since I had extra combs and a whole collection of extra beads from past projects. It is a gold comb with some of the leftover pearls from my Laurel cofia and some leftover jet beads with caps from the first paternoster project.
June Goals
May was a super busy month with this project but June and July are shaping up to be equally as busy. I’ve got a handful of Pennsic prep to do, so all my goals are focused on that.
Garb:
Any pre-Pennsic repairs. There are a handful of seam repairs and finishes that need doing so my garb is in good shape for Pennsic.
Add details to the black saya to make it more fun to wear
Get my brown shoes conditioned and possibly re-soled
Classes:
Write Encapsulating Your Wardrobe class
Prep Grabby Hands for in person instruction at Pennsic