The Elevation Outfit


Overall Stats
This outfit consists of:
The camisa from the Juana in White project, though not fully finished. It still needs seams finished and some decorative blanket stitching on the facing.
A side lacing saya with some subtle trim down at the hem and a fun experiment in applique at the neckline.
A sayuelo made of the same fabric as the saya, with hanging decorative sleeves and a glorious amount of some trims I had saved up for this occasion.
A cofia that is blinged up to hell and back with green and gold rhinestones and some freshwater pearls, and some truly beautiful silk lattice decoration.
A set of removable sleeves in a stunning gold and burgundy silk, with some matching trim and adorable buttons.
A belt with leaf trim and a couple of very meaningful easter eggs.
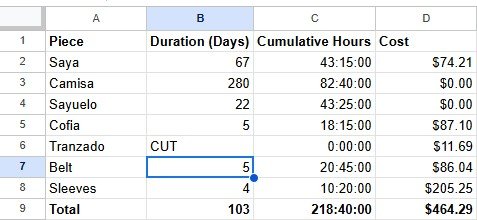
The final cost, duration, and hours of my elevation outfit work.
Shopping
I started off this project wanting to focus on a very specific aesthetic goal. The balance between visual interest, coherence, and variety was a really tight one with this. To this end, the project really kicked off with looking at the fabric I owned in my “this is special” stash and choosing from there. The primary fabric is an artificial silk sari that Sof’ia gave me a while back. It is a translucent red base with embroidered black and green flowers over most of it. I used this as a jumping off point along with the inspiration image above to begin planning. I got a series of fabric samples for working on some design elements and used those to select accents, trims (mostly from my existing stash), notions, gems, and more and all in all, I am happy with the balance I was able to achieve. I got to explore some adorable buttons and lacing tips from Armour and Castings that I’d been eying as well.

Old Fashioned by Silk Baron
From my stash as well, I had been saving several trims that were designs I just loved. The sari did have a border trim, in bright green, that I ultimately decided was too garish, to bright, too much for the aim of the outfit. I had some green and gold thin trim that I had bought from Calontir Trim that I adore and some wider, more muted olive green/gold trim that I used throughout the project to tie the individual pieces together. The subtle coordination on the saya, the sayuelo, and the sleeves I think really is a great way that the outfit works as a cohesive vision. Each piece can stand on its own really well, but together, they just fit.
The other shopping I did was purchasing two yards of silk from Silk Baron for the removable sleeves of the outfit. It’s super gorgeous gold and red and delightfully luscious and I was terrified to cut into it. This silk made the base of the sleeves, and a large amount of fabric tape that was used for button holes, the belt edges, and the cofia lattice work.
The Camisa

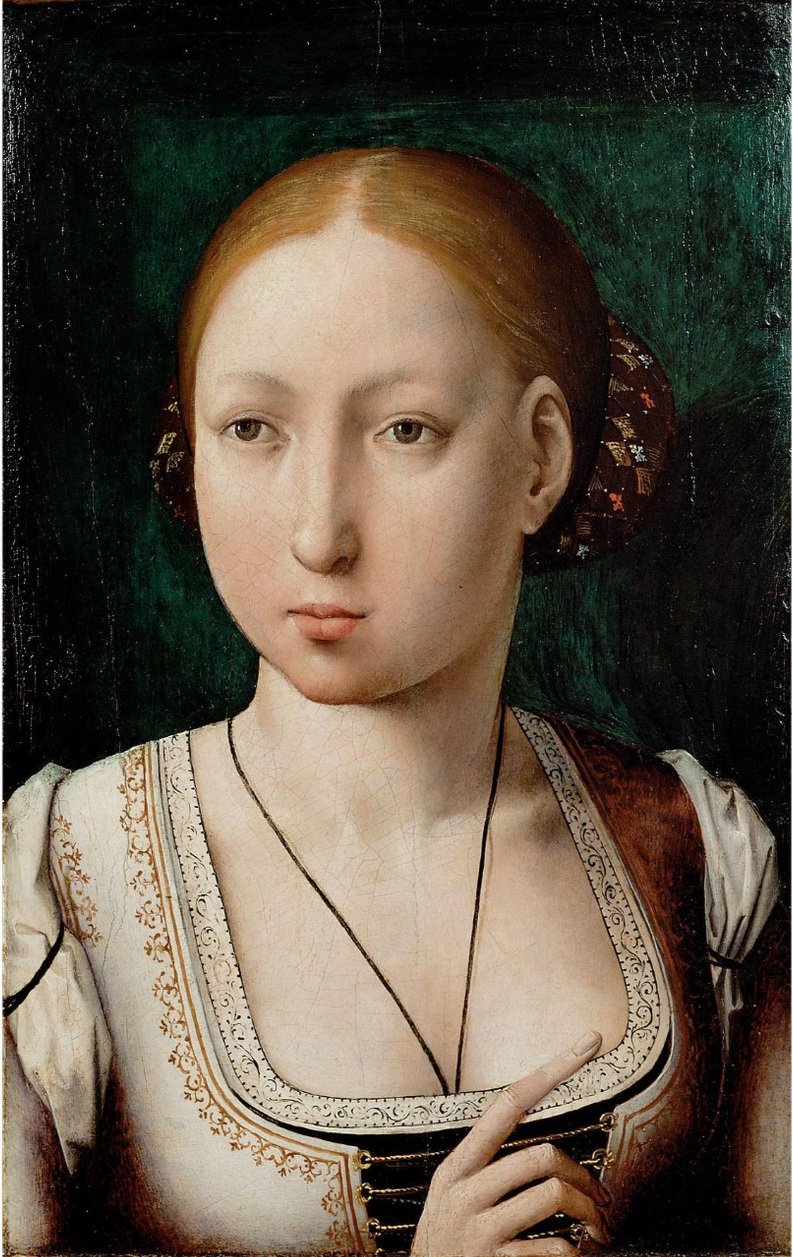
Juana “the Mad” (1473-1555) by Juan de Flandes held here.
This camisa was not actually originally part of this project. Its original, and still, purpose is part of the Juana in White outfit. This camisa design has been in process since post Pennsic 2024, where I began experimenting with different ways to transfer the pattern onto the facing. This outfit of Juana’s is one I love dearly and have mentioned in previous blog posts and this camisa is an attempt at starting it.
When I settled that this camisa would be part of my elevation outfit, I needed to make a couple of adjustments. Namely, when I was informed, this item was in Project Jail thinking about its sins. I had tried some new techniques and they were just not working out the way I wanted them to on fit. So first thing was first, the fit had to be corrected so I could actually wear her. I added some gores and all was well.
The second thing that this camisa was in Project Jail for was the neckline facing. I had to entirely redo it after trying to measure it out failed me abysmally. Starting from scratch allowed me to do some updates to my stitch pattern, which was nice and she did get done eventually.
As a learning experience, I suppose it’s always nice to be reminded that your process is your process for a reason and sometimes, you don’t need to fix what isn’t broken. The embroidery on the camisa and the reclaimed placemat/handkerchief that I definitely spent the day at my elevation crying into are lovely and they do ultimately do what I want them to as items.
The camisa did not get fully finished before my elevation. It still needs its seams finished, some minor repairs made, and the decorative blanket stitches added to the facing. I look forward to this being my immediate next project after my elevation and getting back into Juana’s outfit.
This item has so far taken 82 hours and 40 minutes over 280 days (with Jail time factored in).
The Saya

From a patterning perspective, I used the green saya I made recently for Pennsic as a fitting guide. I thought the slight extra ease in the pattern would work well with the fabric having less overall give than linen does on the green saya and I think I achieved that. I ended up using lacing rings as well, though I think in the end, I will pull those off and go back to eyelets, just like I did on the green too.
The construction on this saya was honestly fairly straight forward. Knock on wood, but I think I’m in the groove with sayas and how I like them to be built and fit at this point. While a fairly simple garment overall, I think she’s very effective at communicating the look that I wanted. I had a very limited amount of fabric that I had to stick to, because I had one sari and one sari only and it had to stretch over two whole garments. For the saya, I decided to use the end that had no embroidery for the bodice, and the roughly three yards that only had half the fabric embroidered with the stars for the skirt. The sari itself was fairly translucent, so the whole garment is lined in red linen from Fabrics Store and the bodice has an interlining of cotton duck. In order to improve the drape on the skirt with the constrained fullness, I added a silk binding to the top edge to give the pleats even more body.
The inspiration image has a very distinct backward slope to the skirt, and the pleating pattern of the Persona Pentathlon vasquiña does a great job of emulating that backward train look without actually having a train. The theory worked great on this garment too, and I love how well the shape of this saya mirrors the inspiration image itself. The original image does have the woman wearing an underskirt, which is the one that flows, beneath her saya, however it was 90 degrees and vilely humid, and I chose to spare myself the heat stroke potential instead. Ultimately, I think the silhouette is very successful even without it.
I did get to try two new things with this saya that I have not tried before. The first is the appliqued flowers on the neckline. I had some spare embroidered pieces from off cuts of the fabric itself that it felt a shame to waste. I’ve never tried this style of applique before, but I pinned them into place on the neckline with some of the ground fabric still in around them, sewed that down densely around the edges of the flower, then trimmed the ground fabric back as close to the flowers as I could manage. I’m quite pleased with the results!
The other new thing I tried is the detachable sleeves. I’ve wanted to do these in the past but have only ever done them as pinned sleeves. The inspiration image has visible anchor points with the camisa under them, so buttons felt most appropriate. For time’s sake and simplicity. I sewed in a strip of silk tape that matched the sleeves and left horizontal openings for the buttons along the inside of the armscyes. This looked great, but ultimately did not hold up on the day of. The buttons slipped right out due to the weight of the sleeves. I will need to revisit them and try legitimate button loops next but I think I can salvage the silk tape to do so.
This item took 43 hours and 15 minutes over 67 days.
The Sleeves

When I started with the inspiration image, I knew I wasn’t going to have enough of the sari for the full sleeves depicted on the sayuelo. Knowing I would need to be doing decorative sleeves on that garment, I decided I wanted to include a set of removable sleeves to elevate the outfit as a whole a little, as well as to provide options for colder weather and more formal occasions.
The sleeves are based on the pattern I used with the 14th century saya. They are fairly fitted and have false buttons in two points on the arms to keep the fit the way I wanted, but also to help create the ideal cute puffs of the camisa underneath. The buttons at the wrist use a small strip of fabric tape much like the buttons at the top of the sleeves did, which could also stand to be revisited for durability long term. I also decided to decorate the wrists with the same thin green trim as on the saya and sayuelo to help more thoroughly integrate the sleeves into the outfit. The fabric was a tad more orange reading than I expected it would be in larger scale, but somehow, it still works.
I wasn’t really sure how these were going to go. The sleeves I’ve made in the past have been a mixed bag, and I’ve never done them with a fabric quite as unforgiving as silk. However, I’m really pleased ultimately. The attachment points are still a work in progress, but I got these fitted and correct on the first pass of patterning, which is way more of an accomplishment than I expected. I’m looking forward to learning how I can add them to other outfits too.
These items took 10 hours and 20 minutes over four days.
The Sayuelo

I did a lot of thinking about this picture and ultimately concluded that the garment in question was a short bodice that ends around the natural waist with an applied peplum skirt. My logic being both where the stripes end on the source image (they don’t go down the skirt at all around the sides), the smoothness of the top and fullness of the peplum, and the way the belt sits between the two areas shows no gathering around the top edge like it does on the bottom. I think, then, that it’s pretty reasonable to assume there is a waist seam, that may or may not be embellished, and that the front opening on the skirt may also have trim on it. I have only done a couple of front opening pieces, the most recent being the Pentathlon Gonete before this, but I decided to attempt the lacing rings method internally, with hooks and eyes to hold it flat on the front. My goal here is that I want to be able to wear this supportively without the saya underneath if I so choose, with something like the Pentathlon vasquiña. The combination of two garment layers was an interesting extension of something I ruled out during the Persona Pentathlon Gonete projects.
I also decided that this garment is not a gonete, but a sayuelo instead. Very few of the gonetes I’ve found for surveys cover the hips as far down as this peplum does and there is a similar garment worn by men, also with a mid thigh length skirt called a sayuelo. Consuelo at Opus Incertum Hispanicus delineates the difference for women being length possibly. But she does identify this particular example as a sayuelo, so I’m sticking with that definition.

Mariana: 1. Trim Chicken: 0.
This is the first set of garments I’ve constructed that’s really as interdependent on each other as the camsia, saya, and sayuelo are. The saya had to be cut so that the camisa facing was visible. The sayuelo had to be cut so that the saya was not that visible. All in all, this was a fantastic opportunity to explore how order of operations and project planning affects the ultimate outcome of a garment’s design. I think for the Juana in White project, I’m going to do things in a slightly different order. The camisa is soon to be done, but the next visible line/layer is the white sobresaya, with the black saya verdugado being largely invisible between the two and only visible where the sobresaya opens at the front. So where for the Elevation outfit I went camisa -> saya -> sayuelo, I want to try going camisa -> sobresaya -> saya for the next one and see where that lands me.

The back is somehow one of my favorite parts.
I beat Trim Chicken so hard on this garment. Going into it, I knew I was going to need to be very judicious about how I did the trim because I would not be able to get more if I messed up. I measured probably five times before cutting once on every single piece of trim on this piece. At the end of the day, from about four to four and a half yards of each the wide trim and and the thin green trim, this picture on the left is all that I have left (at most six inches of each). The final design has the wide trim going down the opening edges, i.e. along the neckline, the front edges, and the hem, as well as two on the back and the thin trim forming accents to give additional lines to more closely approximate the striped design along the back without stressing my resources too thin. This trend continued with the silk tape that I made for the belt, the cofia, and for the button holes, which was just fantastic.
The decorative rectangular sleeves as well are such a fun touch. I still have some of the green and black flowers left, and have been considering appliqueing them onto the linen lining of these sleeves down at the bottom hem for additional pop. There are also a couple spots up toward the top of the back that can be seen to the right that could use a small flower, just to complete the balance of the design.
As a garment, I can honestly see myself getting behind the sayuelo. It’s structured without being constricting, it has a lot of potential for dressing up or dressing down, and I can see it working in a variety of fabrics outside of the silk I chose for this piece. I think one of these, with integral sleeves, and in wool would be an excellent winter addition that could help with the layering that weather in Atlantia often requires for survival in the weird weather swings it gets. I also think this garment will be a great informer of how I ultimately do the overdress I have planned for the 14th century outfit as well.
This piece of the outfit took 43 hours and 25 minutes over 22 days.
The Cofia

The blingiest headwear I own and I am here for it.
This part of the outfit was originally intended to be both a cofia and a tranzado and is a great lesson in sometimes, cutting project pieces is necessary for the health of the project as a whole. The tranzado did not get made in time for my elevation, and honestly, I’m not too upset about it.
I had a vision when designing these two pieces of matching decorative elements on both with the green stones and the freshwater pearls as cool toned contrasts to the warmer toned silk lattice. On the cofia, I think it’s pretty successful. The source image has the cofia with a wide band that is heavily beaded on the front, mirroring the beading pattern of the body of the slouchy cofia, that is definitely integral with the tranzado given how it is wrapped. I don’t love integral tranzados, mainly because while my hair is long, it’s not long enough to make that work easily and I have no intention of it ever being so.
The Belt

I goofed up and forgot one very important detail about elevations and specifically about belts- I had to give mine back to Bea. My apprentice belt has been my only SCA belt for a long time, and it was an unexpectedly emotional part of the ceremony to give back. However, it was a great opportunity and I decided to take it to make something meaningful.
The ultimate design for the belt is meant to be a piece of nice regalia. I chose a metallic leaf trim from Mood Fabrics that is a good Laurel leaf equivalent to be the regalia aspect, used some more of the silk from the sleeves to make fabric tape edges, and some luscious tassels with decorative caps to make it look fancy. But the meaningful parts are a little more hidden on this piece. The ground fabric is fabric left over from Bea’s Laurel dress, so that no matter what, I still get to carry a piece of her with me.

The other easter egg here is a post-SCA period Judaism plant. An 18th century Rabbi, Rev Simcha Bunem is credited with the practice. In his pockets he is said to have carried two slips of paper. On one was written the words "bishvili nivrah ha-olam” which translates to “For me, the world was created” (on the left side in the image to the left) and on the other “v’anochi afar v’efer” which translates to “I am but dust and ashes” (on the right side in the image to the left). Each is meant to bring balance to their reader in times that those are needed. We are encouraged to approach knowledge with a boundless joy for learning, while knowing that we as people are not perfect, and maintaining that humility as we go about life. These two reminders seem very poignant as an incoming Peer. And so, along with the reminder of the people that helped make me the Peer I always will aspire to be, I carry these with me.
These were also an interesting experiment in embroidery techniques! I ended up using printouts of each word pinned to the belt ground as my template. This is a first for me and I think once I got the hang of it, it worked well but you can definitely see the improvement from the first side to the second. Each letter was outlined in a double running stitch and filled in with a satin stitch. I think this technique allowed for an actual font with some visual interest in a way that my previous word stitching hasn’t really, especially for a non-Latin alphabet.
This item took 20 hours and 45 minutes over five days.
Final Thoughts And Follow Ups
I could not be more happy with how this project turned out. I learned so much, got to try some new things, and the final result is a set of garments that is not only visually stunning in my opinion, but also incredibly comfortable to wear. I love that I have follow up projects from it, new ways to learn and more places to grow from here- it feels fitting for what this outfit represented!
The follow up projects from this are:
Actually finish the camisa
Adjust the button holes on the saya
Make the tranzado that I did not get to
Add extra embroidered stars to the sayuelo