October 2025: Materials Testing
October Goals
Garb:
Prep a muslin of the verdugado pattern.
Test potential verdugo fillings/stiffening agents.
Keep working on hair nets, try to get a round one done!
Classes:
Start reworking some of my previously un-recorded classes for possibly offering at Winter University.
Other:
Paint glasses.
Like the title says, the name of the game this month has been materials testing. I’m working on a handful of projects right now that involve both new to me techniques as well as new to me materials and I don’t like going in blind on most things. There’s some project aspects that I think can fall under “f*ck it, we’re doing it live” but for the pieces I’m working on right now, none of them are. I also weirdly enjoy materials testing. I find it so satisfying to sit down with something and try to pick it apart to understand why it behaves the way it does and how to make it work for what I need it to do.
For the verdugago, there were three important things that happened this month.

Pad stitching materials testing. Top row (left to right): Wool B, Wool A, Wool A + Linen. Bottom row (left to right): Wool A x 2, Wool A + Linen + Wool A, (Wool A + Linen) x 2
First was testing out stiffening schema for the bodice. I’ve been thinking a lot about the structure of the deep open front V-neck in the gown that goes to the natural waist but still needs to support the bust and take the tension from lacing. I understand pad stitching in a theoretical sense and well enough to understand when I am looking at a garment that is supposed to be pad stitched how it should behave and feel, but I’ve never used the technique myself. So this month I started off on the verdugado with both practicing the stitch itself and comparing fabric layer schema to determine how I want to structurally build the bodice on my tester dress.
This stage of testing comes down to a lot of materials physics and how those materials interact to create a final effect. Many of the pad stitched examples from later than my usual period and from England have one fundamental difference with the period I am working with in Spain and that is in the aesthetic priority. Functionally, structure is critical, but aesthetically, this period in Spanish fashion prioritizes a level of softness and flow in its garments rather than just strictly rigid structures. The verdugado is clearly a step in the direction of rigidity in silhouette, but there is an appreciation of drape, flow, and body form that still exists and should be honored. So the question becomes then, “how do I get physical structure without sacrificing that softness?” I tested out six combinations of canvas and fabric to try to find the right balance: Wool A, Wool B, Wool A + Linen, Wool Ax2, Wool A + Linen + Wool A, (Wool A + Linen)x2. My favorite of the six is Wool A + Linen. It strikes a great balance for ease of execution and stiffness achieved without sacrificing minor flexibility to conform to a natural body shape. The cool thing about combining wool and linen in this application is that the two work in tandem to wick away and then to expel sweat into the subsequent layers to help regulate body temperatures. The fact that I’ll be throwing a layer of silk over the top of this is going to obviate that a lot, but the relationship between the two materials is still really cool. Shout out to Hakon for boldly going and stabbing himself with some sharp pointed snips to see how well these might punch test!

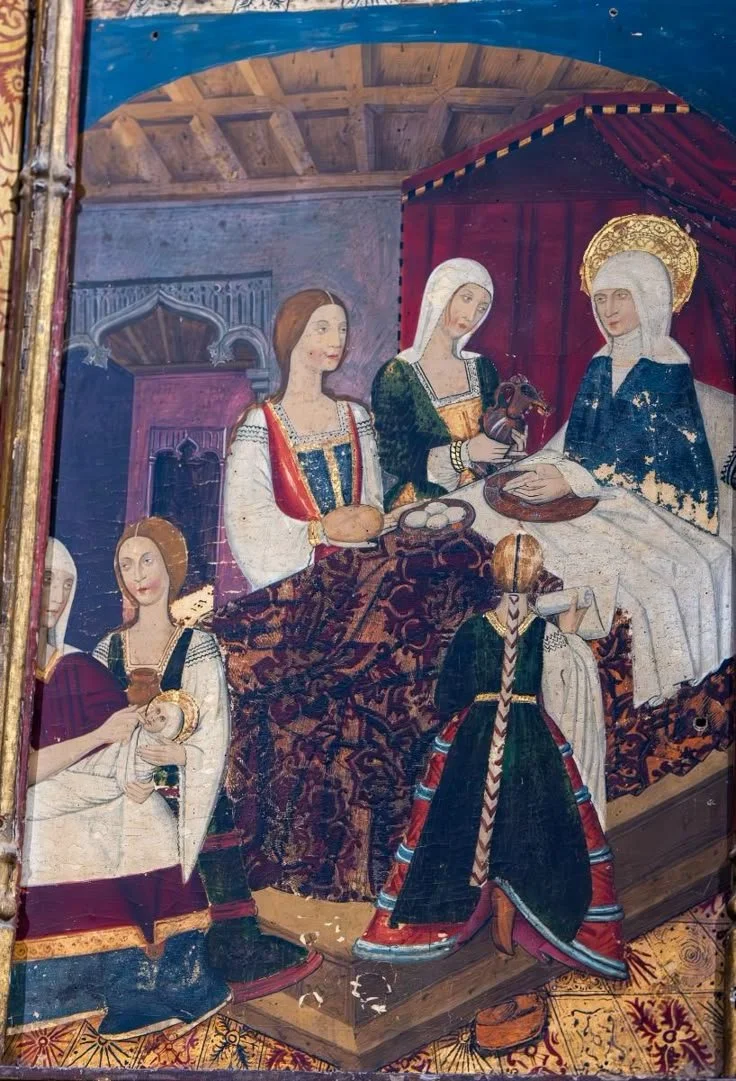
Beheading of Saint John the Baptist by Juan de Flandes
The next part of the verdugado testing is the muslin for the tester dress. I’m doing a tester dress because a) I have a big piece of a silk blend fabric that I need to have a purpose for and b) I have exactly 3 yards of the wool for the verdugado and its sleeves and cannot afford to miscut or mess it up at all. I’m doing this particular pattern as a body block pattern so that I can base it pretty precisely on the neckline facing of the camisa so that it remains fully visible like in the painting. Most of my work on this this month was planning stages. For fit, the armscyes on the Pentathlon Gonete are where I want this dress to sit, so I decided to use that as the base pattern for my muslin. Where I deviated was extending in the neckline, so it could be drawn exactly over where I want the camisa visible, and cutting off the waist a little below my normal saya length. My sayas normally sit a little above my natural waist, but in this period, waistlines begin dropping closer to the natural waist, so I’m adjusting accordingly.
The example picture this test dress is based off of very definitely is an overdress over a structural saya, so I am consciously departing from the source material there. However, it’s a single garment I could make that will sufficiently allow me to test the muslin of the verdugado given the similarities in bodice shape and opening. The opening on this one is notably lower than the usual opening of the verdugados. This will be a departure from the exemplar so I can test out the verdugado muslin and hopefully do double duty making the same black stomacher/modesty panel for both this tester dress and the Juana verdugado. I will not be putting the verdugos on this dress, to keep the silhouette where I want it for the exemplar, and so that I don’t double up too much in my closet. I’m hoping I can have this garment complete in time for Hearthglow in January. I really like that both Salome and her attendant are wearing some more fitted sleeves for this one. I’ll be making the sleeves integral and only opening short sections at the elbow and a small one at the bicep like Salome has in the front.
Retable of the Birth of Saint John the Baptist, Iglesia de Santa Maria la Mayor, 1465-1480, attributed to Tomas Giner and Arnau de Castellnou, photo courtesy of Rachel Vess.
The third piece of materials testing that happened for the verdugado this month was starting to explore stiffening materials. The verdugado is interesting in its departure from other more rigid hoops skirts in that in may examples, you can see that the bands actually bend a bit with the dress. There is one particularly interesting painting (yet again, Saint John the Baptist, to the right, photo courtesy of Duquesa Constanzia Morales ye de la Zamora/Rachel Vess) of a woman kneeling where the bands on her verdugado very obviously bend with her foot. There’s a couple other examples, but this one is the most striking from a visuals perspective.
I think there are a couple different ways that the bands on the verdugado could go and I want to try out a couple of them. The first is that the bands are pieces of rope, covered in fabric. I think unless it was a particularly large rope, single ropes wouldn’t get the width or stiffness that the skirts need though. There’s also a variety of images, like the one to the right that show multiple bands grouped together to form the verdugo. so I want to try:
Single rope, no padding
Single rope, padding
Double rope, padding, joint casing
Double rope, no padding, joint casing
Double rope, no padding, split casing
Double rope, padding, split casing
Natural fiber ropes were a priority here, much like with all my garb where possible so I did not try any of the synthetic options that were available at my local Home Depot. In going in person, I settled on 3/8 inch sisal rope to start with, just because any bigger and it got very lumpy when put against fabric. I went with sisal over manila as the primary test material because sisal is a bit more flexible than manila, which will aid the slight flexibility I want in these bands.
The band tests themselves were constructed by basting the rope over a layer of canvas, then adding the additional layers laid over the rope and sewn to the canvas as well. The goal here is to give the bands a single structure instead of possible slippage between the rope, padding, and outer casing. For outer casing fabric, I did two layers. The first layer is a layer of linen, meant to disguise the texture of the band contents. The second layer on the actual outfit will be silk, though for these tests I used another layer of a slightly heavier linen.
I used rope for all these tests, but I do want to acknowledge that there is a chance that quilted stiffening, a la pad stitching or other more structural quilting, could also be a possibility here. My favorite of the tests was the double rope, with padding and a single casing, so that’s what I’ll be moving forward with.
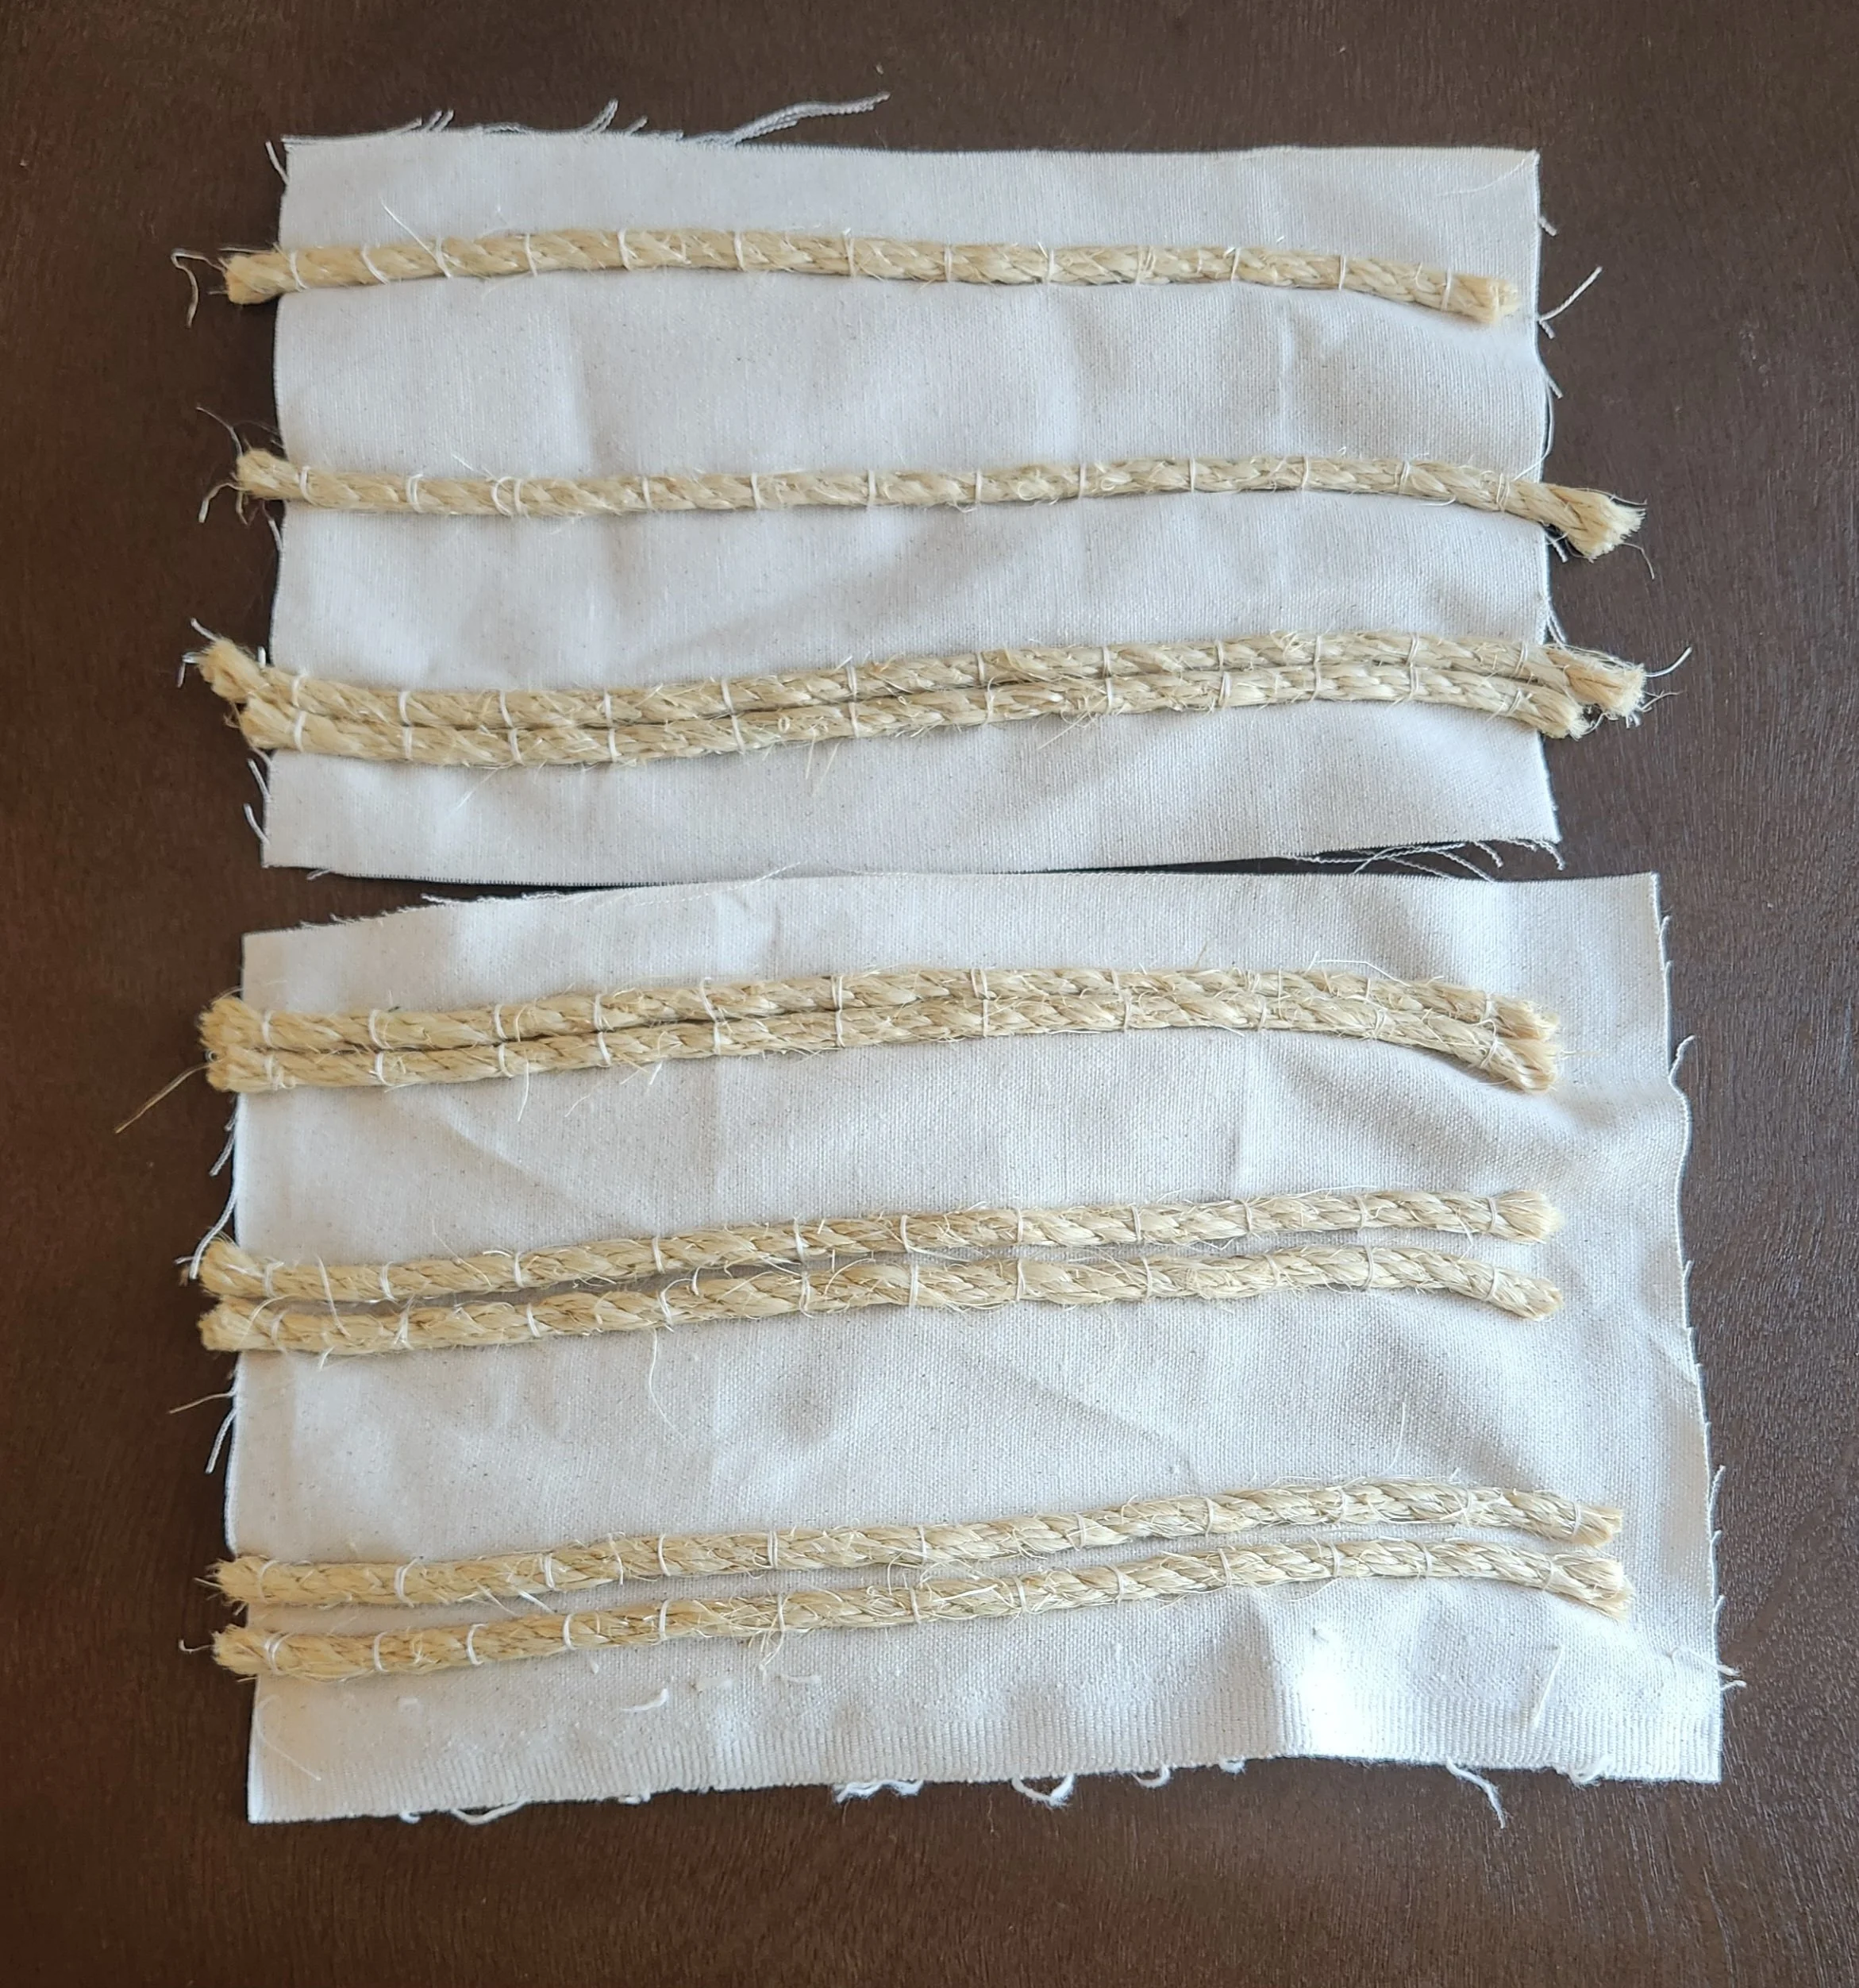
Rope tests getting set up!
My hairnet experiments continued with circular hairnets this month as well. I had some real trouble with the instructions as written on the original site I found- somehow, I am missing how this person does their increases to get a truly circular hairnet with a neat gridded diamond pattern. I think they’re relying on a very gradual increase between each row to add one stitch every row after the second one, but I have yet to be able to re-create that growth pattern. What I was able to do is follow a pattern for a circular net that had regular increases. I added my own non-increased rows for stability purposes and the final pattern ended up being:
Cast on 10 stitches using a larks head knot
Row 1: no increases, 10 stitches
Row 2: increase every 2 stitches, 15 stitches
Row 3: increase every 3 stitches, 20 stitches
Row 4: increase every 4 stitches, 25 stithces
Row 5: no increases, 25 stitches
Row 6: increase every 5 stitches, 30 stitches
Continue, increasing every X stitches, where X is the number of your increase row. Every 5 rows, do 1 row with no increases. Repeat this process until the net is your desired diameter before tying off.
The resultant net is much denser and does not have a neatly repeatable grid pattern like I was aiming for with the hairnet. I will need to revisit the original method and try to improve and see if counting the rows more closely and the stitches per row helps with that goal. However, it is a serviceable hairnet so I’m calling this a win for the month! I did end up getting myself a round pillow and row counter to make my netting kit a little easier to work with and keep on hand. My hope is that between being able to lay the work out a little more neatly and add some additional tension to the outer edge instead of the center will allow me to better envision where the increases need to happen in order to achieve my elusive grid structure.
I finished my hairnet off with a band of fingerloop braid woven through the outer edge to tighten and contract it, so it’s officially wearable!

Painted heraldic glasses
Over Yom Kippur, I painted two drinking glasses with my heraldry to add to my feast gear kit. This served double duty on materials testing because now I have a great present option for people and I have had the ability to test the paint I plan to use on decorative pewter lacing rings for Juana’s verdugado. I’ve chosen a set from Billy and Charlie that visually works, but because pewter is so malleable, I plan to have a more durable set obscured just inside the dress and just have the decorative set to guide the lacing in the right direction but not really take any tension to preserve their structural integrity. I’m thinking of mounting them on a pad stitched canvas strip and then sewing the strips in so that their edges are just inside of the opening of the dress. The enamel paints worked great and were incredibly easy to do as home baked enameling. The glasses were a fun project to test out- there’s never such thing as too much drinking wear in a feast gear kit- and now I finally have a thing that my twisty stoat is on! This is my first piece of kit with my badge on it and I am just enamored.
For classes, I’ll be re-recording The Foods That Built Spain in December for the pre-Highland Hearthglow lecture series, to keep it up to date with my Compleat Anachronist, which is on its final steps. I’ll have to look for some opportunities in the future to revisit the two classes I’d like to revamp and record- Spanish Women’s Undergarments and Monochrome Embroidery From Around the World. These definitely need some re-writing now that I’ve expanded into new styles of both embroider and undergarments, as well as some more rigorous evaluation of linen production in Spain, the ties to both Islamic and Italian fashions, and more extensive examples from paintings. I’ve got a rough idea at this point of the improvements I’d like to make, but I’ll need to find an opportunity/time to do them.
Other things that happened this month:
I started a Ladino course though the Oxford School of Rare Jewish Languages! This is a really exciting moment for my persona journey, to get to interact with a form of language that my persona could plausibly have interacted with. This is modern Ladino/Judezmo, so definitely not a 1:1, but it also includes an exploration of scripts, how Ladino differs from Spanish and Hebrew, and I am really looking forward to continuing it. My course, Beginners Ladino for Spanish Speakers, covers three terms, so I’ll be doing this once a week through June, with a couple breaks thrown in.
I do also want to bring back my monthly research piece habit. I fell out of that during panic sewing and I’d like to pick it back up. So I’ve picked one for November that’s a little shorter, just two papers, but I got a new book recently that I think I’ll try for December. One paper explores agricultural trade and the other explores the blending of cultures, and I picked it to get in the mood for the Hearthglow lecture series starting in November.
November Goals
Garb:
Try to figure out my hairnet issues
Start cutting and sewing my Pad Stitch Test Dress
Classes:
Start outlining and researching Spanish Women’s Undergarments improvements
Research: Tracing Local Production and Agricultural Trade: A Multi-Analytical Study of Roman Amphorae at Conímbriga by Buraca et al. and Cultural and Religious Boundary-Crossing in Early Modern Spain by Miriam Bodian